Fleet Director Basics
Welcome to Fleet Director
This Help File explains the activities and functions that users can perform with Fleet Director. Direct any questions to one of our Customer Service Centers found below:
For Service in the United States:
Phone: 1-800-487-4357
Email us at: customerservice@teletrac.com.
For Service in the United Kingdom:
Phone: 0345 604 8864 (Fleet Director training or technical support team)
Email us at: fleetsupport@teletrac.co.uk (Fleet Director Support)
Logging In
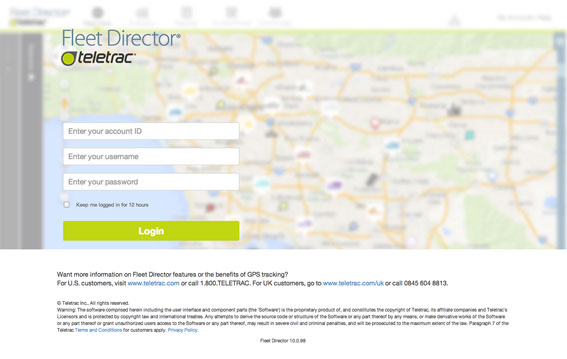
To access Fleet Director, go to teletrac.com and click on Customer Login in the upper right portion of the screen.
To ensure the security of your account, each user must enter specific login credentials to access the Fleet Director software. Login credentials consist of an Account ID, Username and Password.
To log in to Fleet Director, enter your Account ID, Username and Password. Then click on LOGIN.
Your session remains active as long as you are using the software. To keep your session active for up to 12 hours (even if you are inactive in the software), check the “Keep me logged in for 12 hours” check box.
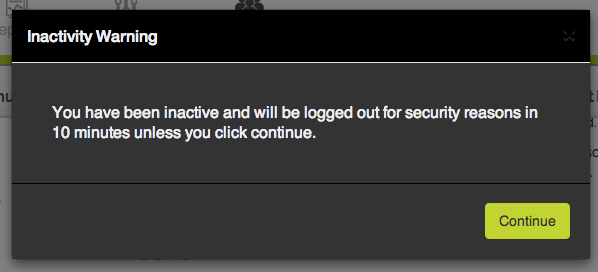
For security purposes, Fleet Director has a 30-minute timeout. When users are inactive for 20 minutes, activity warning pop-up will appear. If no action is taken, users are logged out of Fleet Director.
Click Continue to stay logged in to Fleet Director.
To bypass the 30-minute timeout, make sure to check the Keep me logged in for 12 hours check box.
If a user enters an incorrect Username or Password, the following message displays:
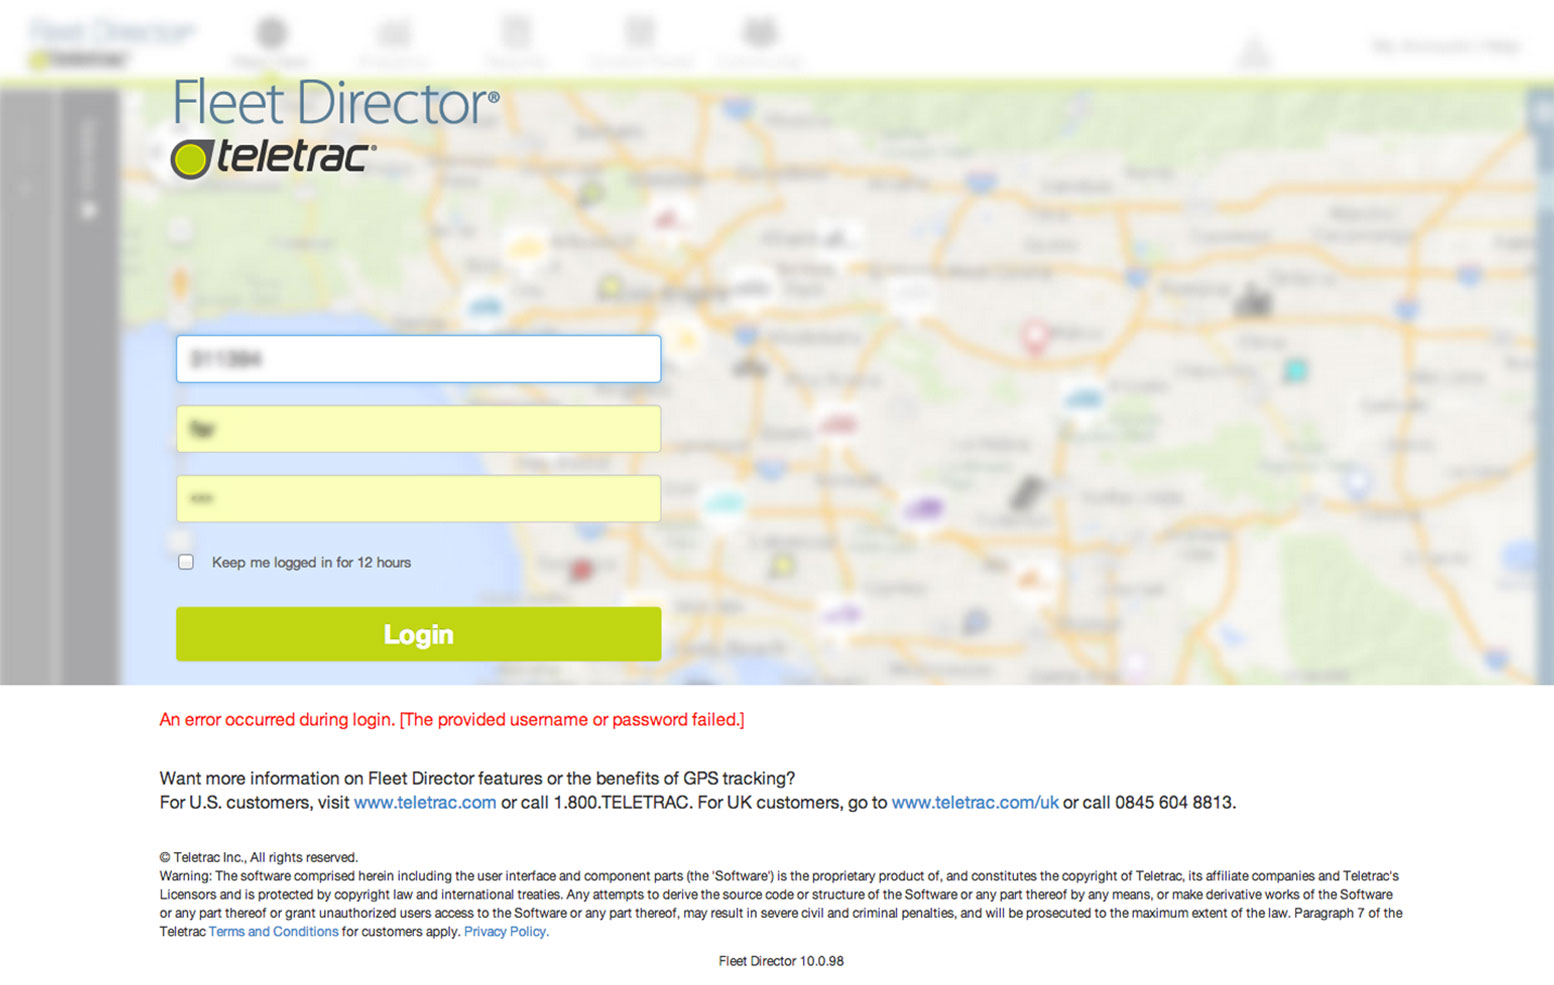
(Note that a valid Account ID, Username and Password are required to access Fleet Director.)
If you need assistance, please contact Customer Support at 1-800-487-4357, or via email at customerservice@teletrac.com.
Navigation Bar
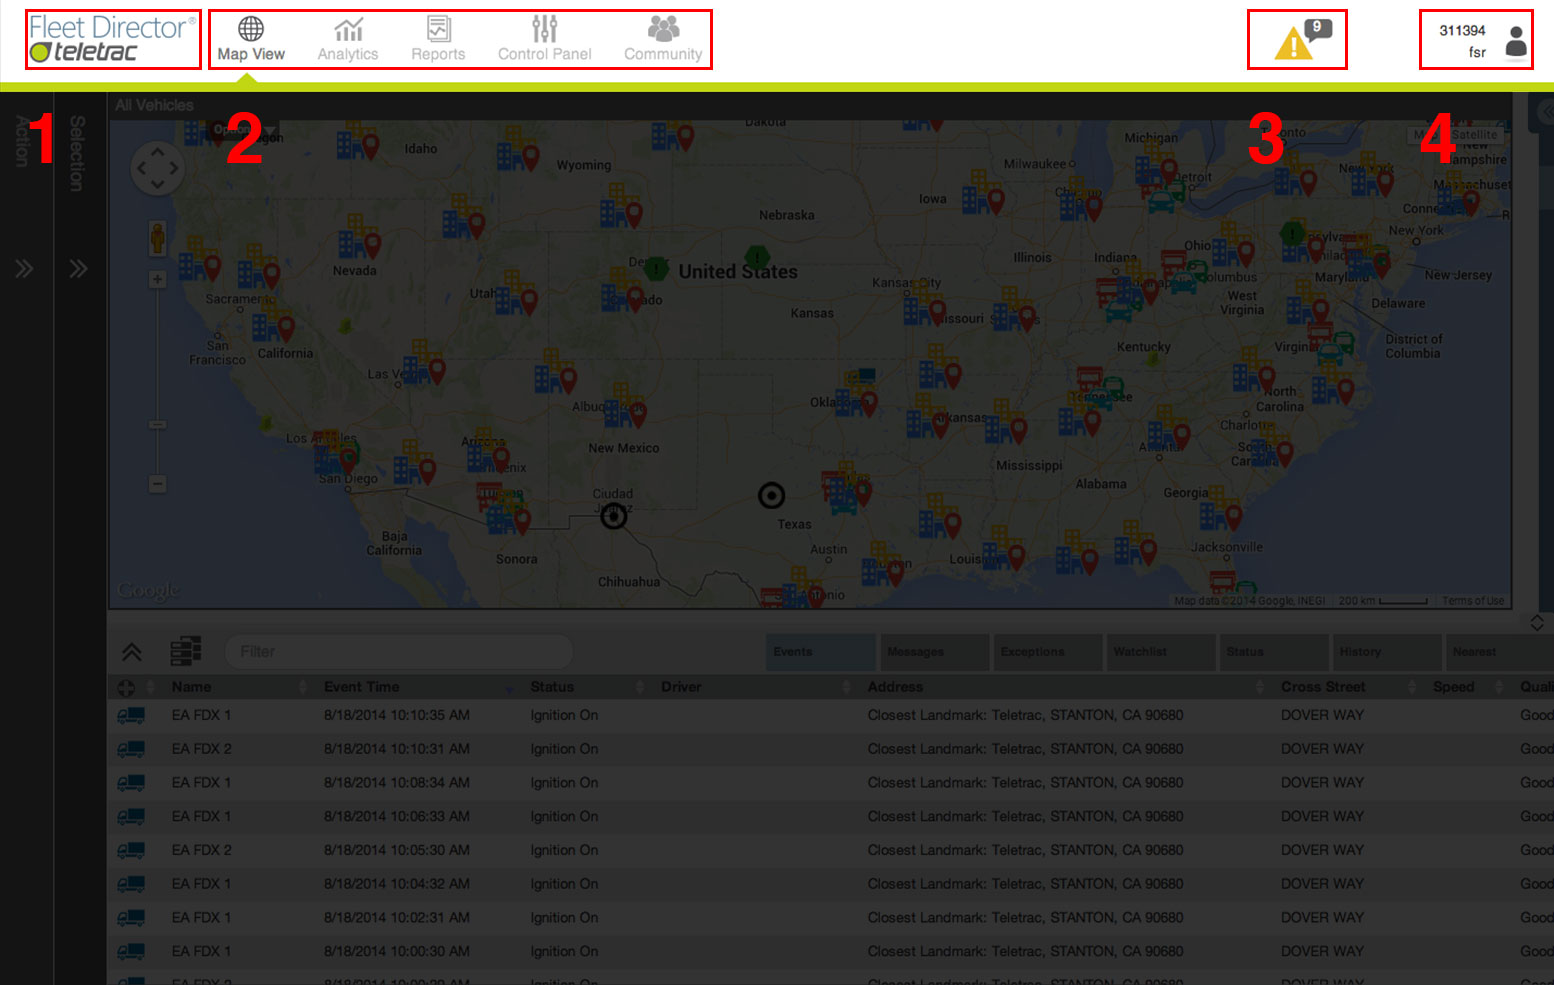
- Branding
- Tabs – Access the different features within Fleet Director by selecting a tab from the navigation menu.
- Map View – Default view of Fleet Director where users have full visibility of their fleet in a live map and data table.
- Analytics – Dashboards and data for Fleet and Safety Analysis.
- Reports – Schedule and run reports.
- Control Panel – Set up vehicles, landmarks and users. Organize units and create
- Community – Help file, FAQs and feature announcements.
- Notifications
- Account Menu
- Change Password
- Change Language
- Log Out
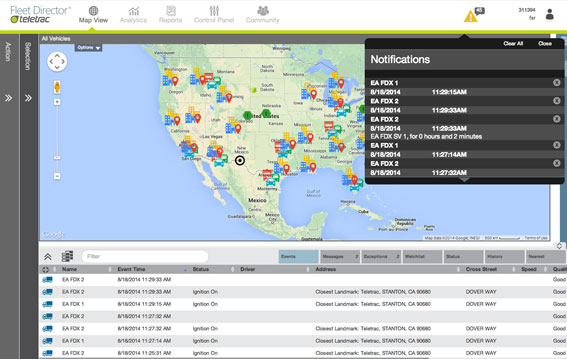
Notifications
Pending notifications are collected in the notification modal. When the notifications icon is orange then the user has unread/pending notifications. The number of notifications is displayed in speak out bubble. If the icon is grey then there are no new notifications.
- Select the Notifications icon, which will open a drop down modal.
- View notifications in order of arrival.
- Clear a notification by selecting the “x” button.
Clear all notifications:
- Select “Clear All”
- Confirmation pop up appears.
- Select “Clear All” to confirm delete.
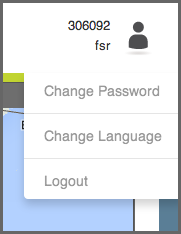
Account Settings
Change Password
You can Logout, Change Password, and Change Language by clicking on the User Menu located in the top right hand corner of the Fleet Director window.
To log out of Fleet Director, select and click on Logout.
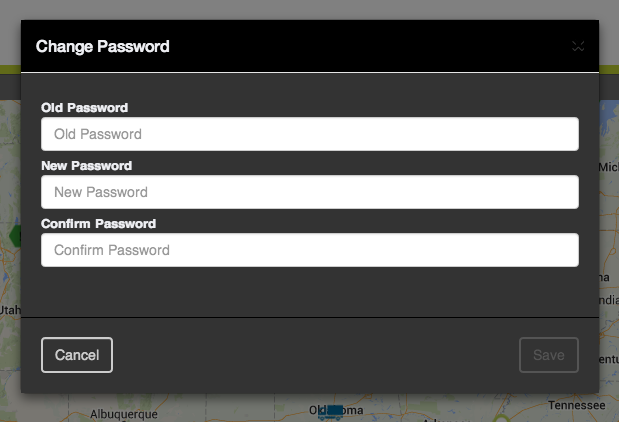
The Change Password feature allows users to change their password to log in to Fleet Director at any time. This is also a Security Group function.
To change the login password, select and complete these steps:
- Select Change Password.
- Type in your old/current password.
- Type in your new password twice.
Passwords can be alphanumeric and must be a minimum of three characters in length:
Change Language
To change the language, select and complete these steps:
- Select Change Language from the Account Menu.
- Choose a language from drop down box.
- Select Change.

Log Out
Map View
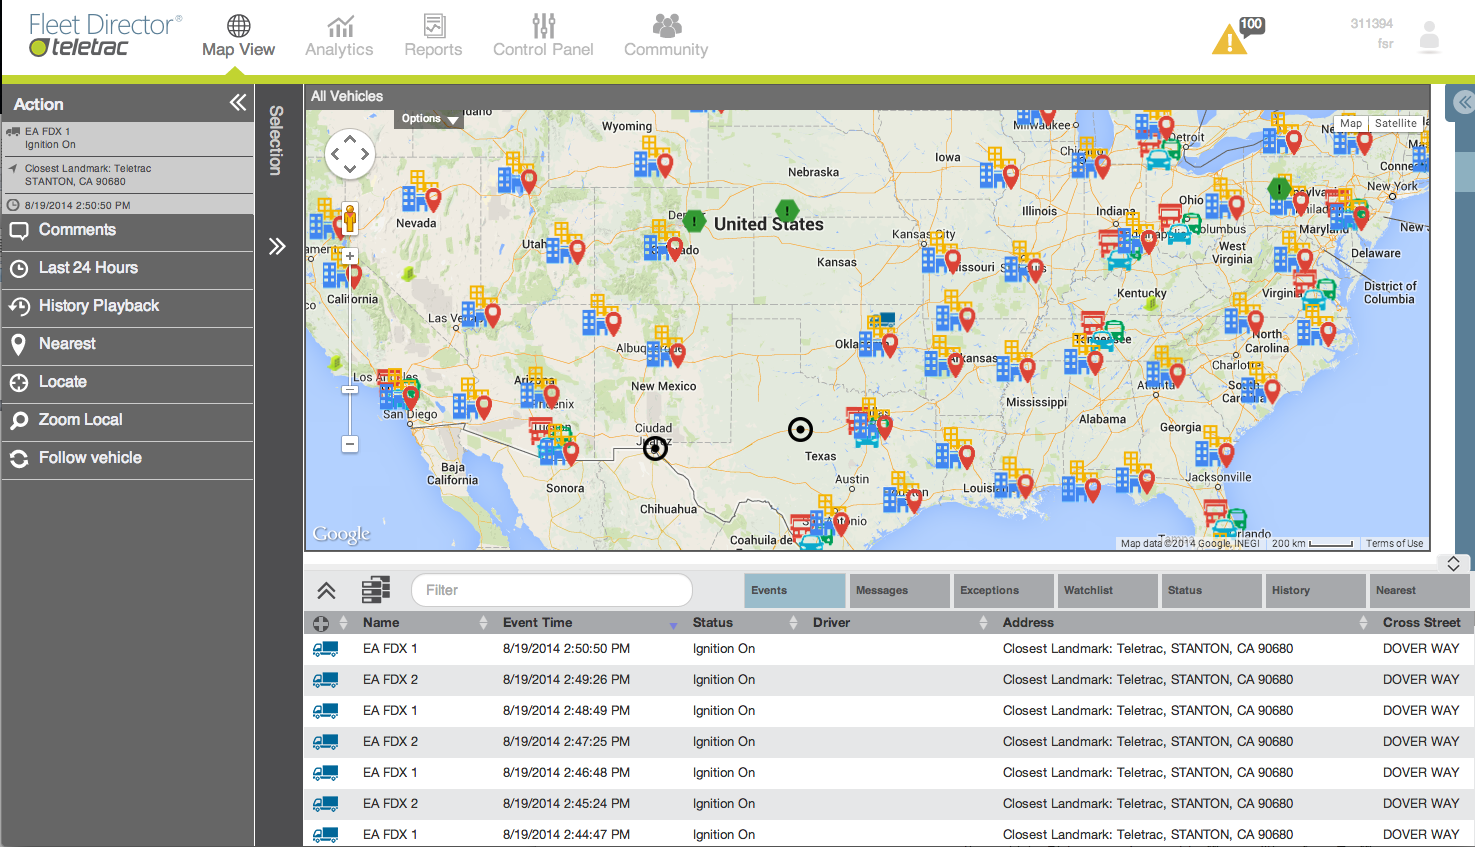
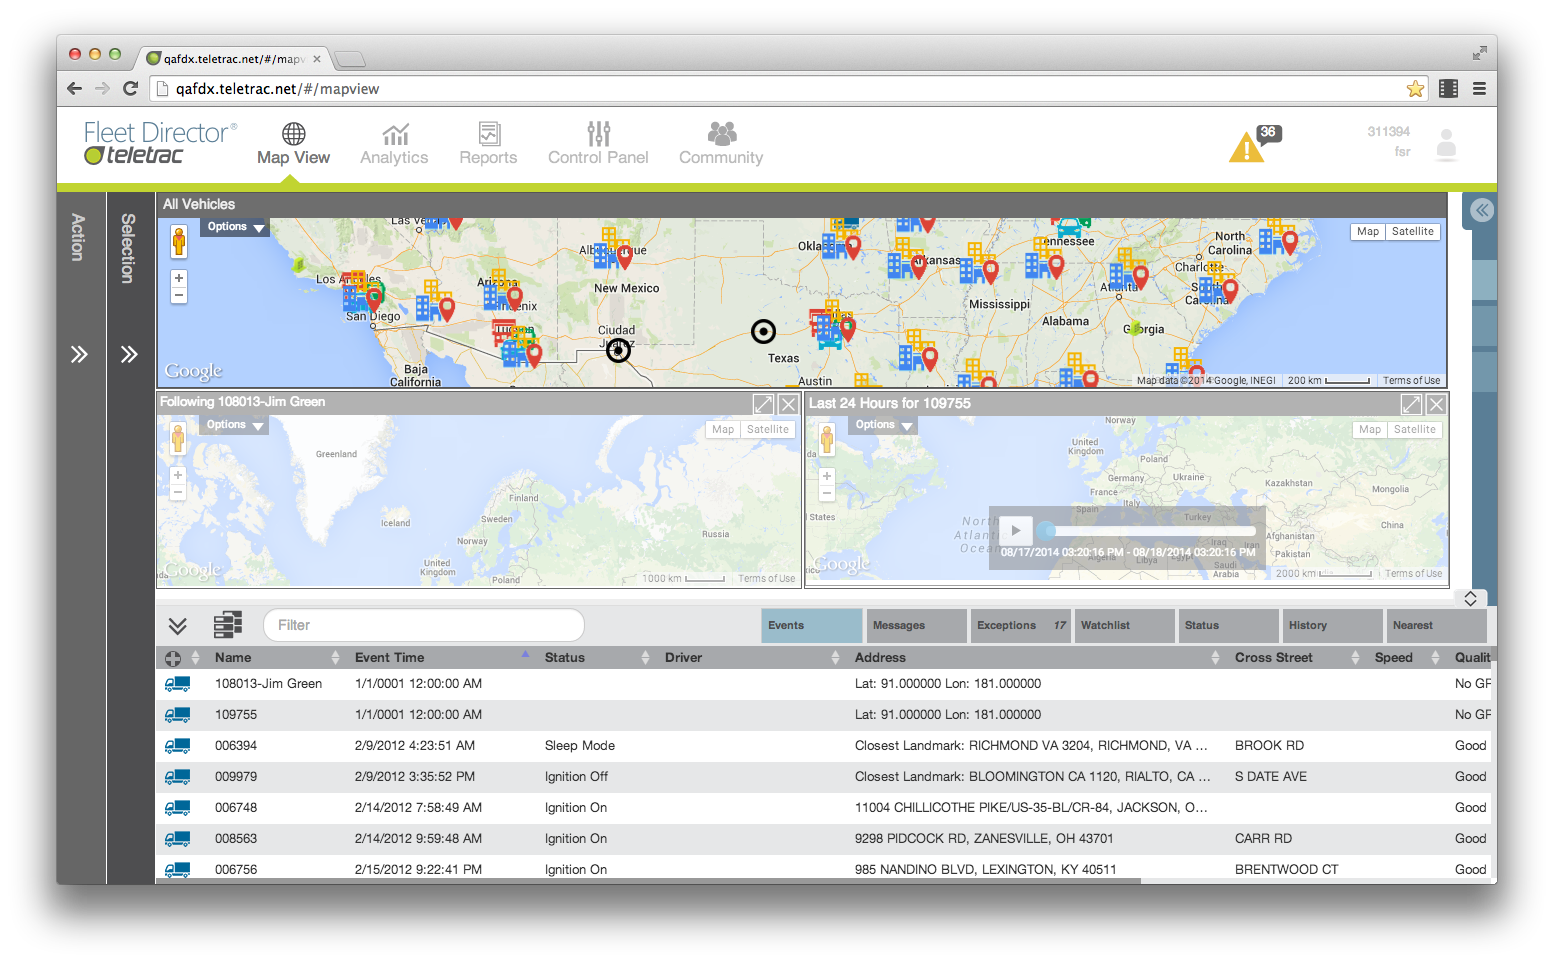
Map View
Screen Overview
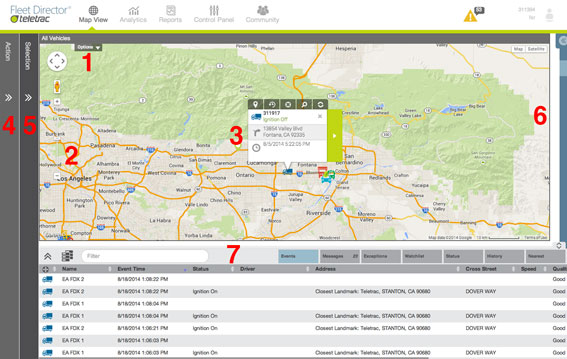
- Options – Toggle on/off map elements such as Clusters, Landmarks, Polygons and Traffic.
- Google Controls – Native Google controls allow zooming, panning, satellite/ terrain and street map views.
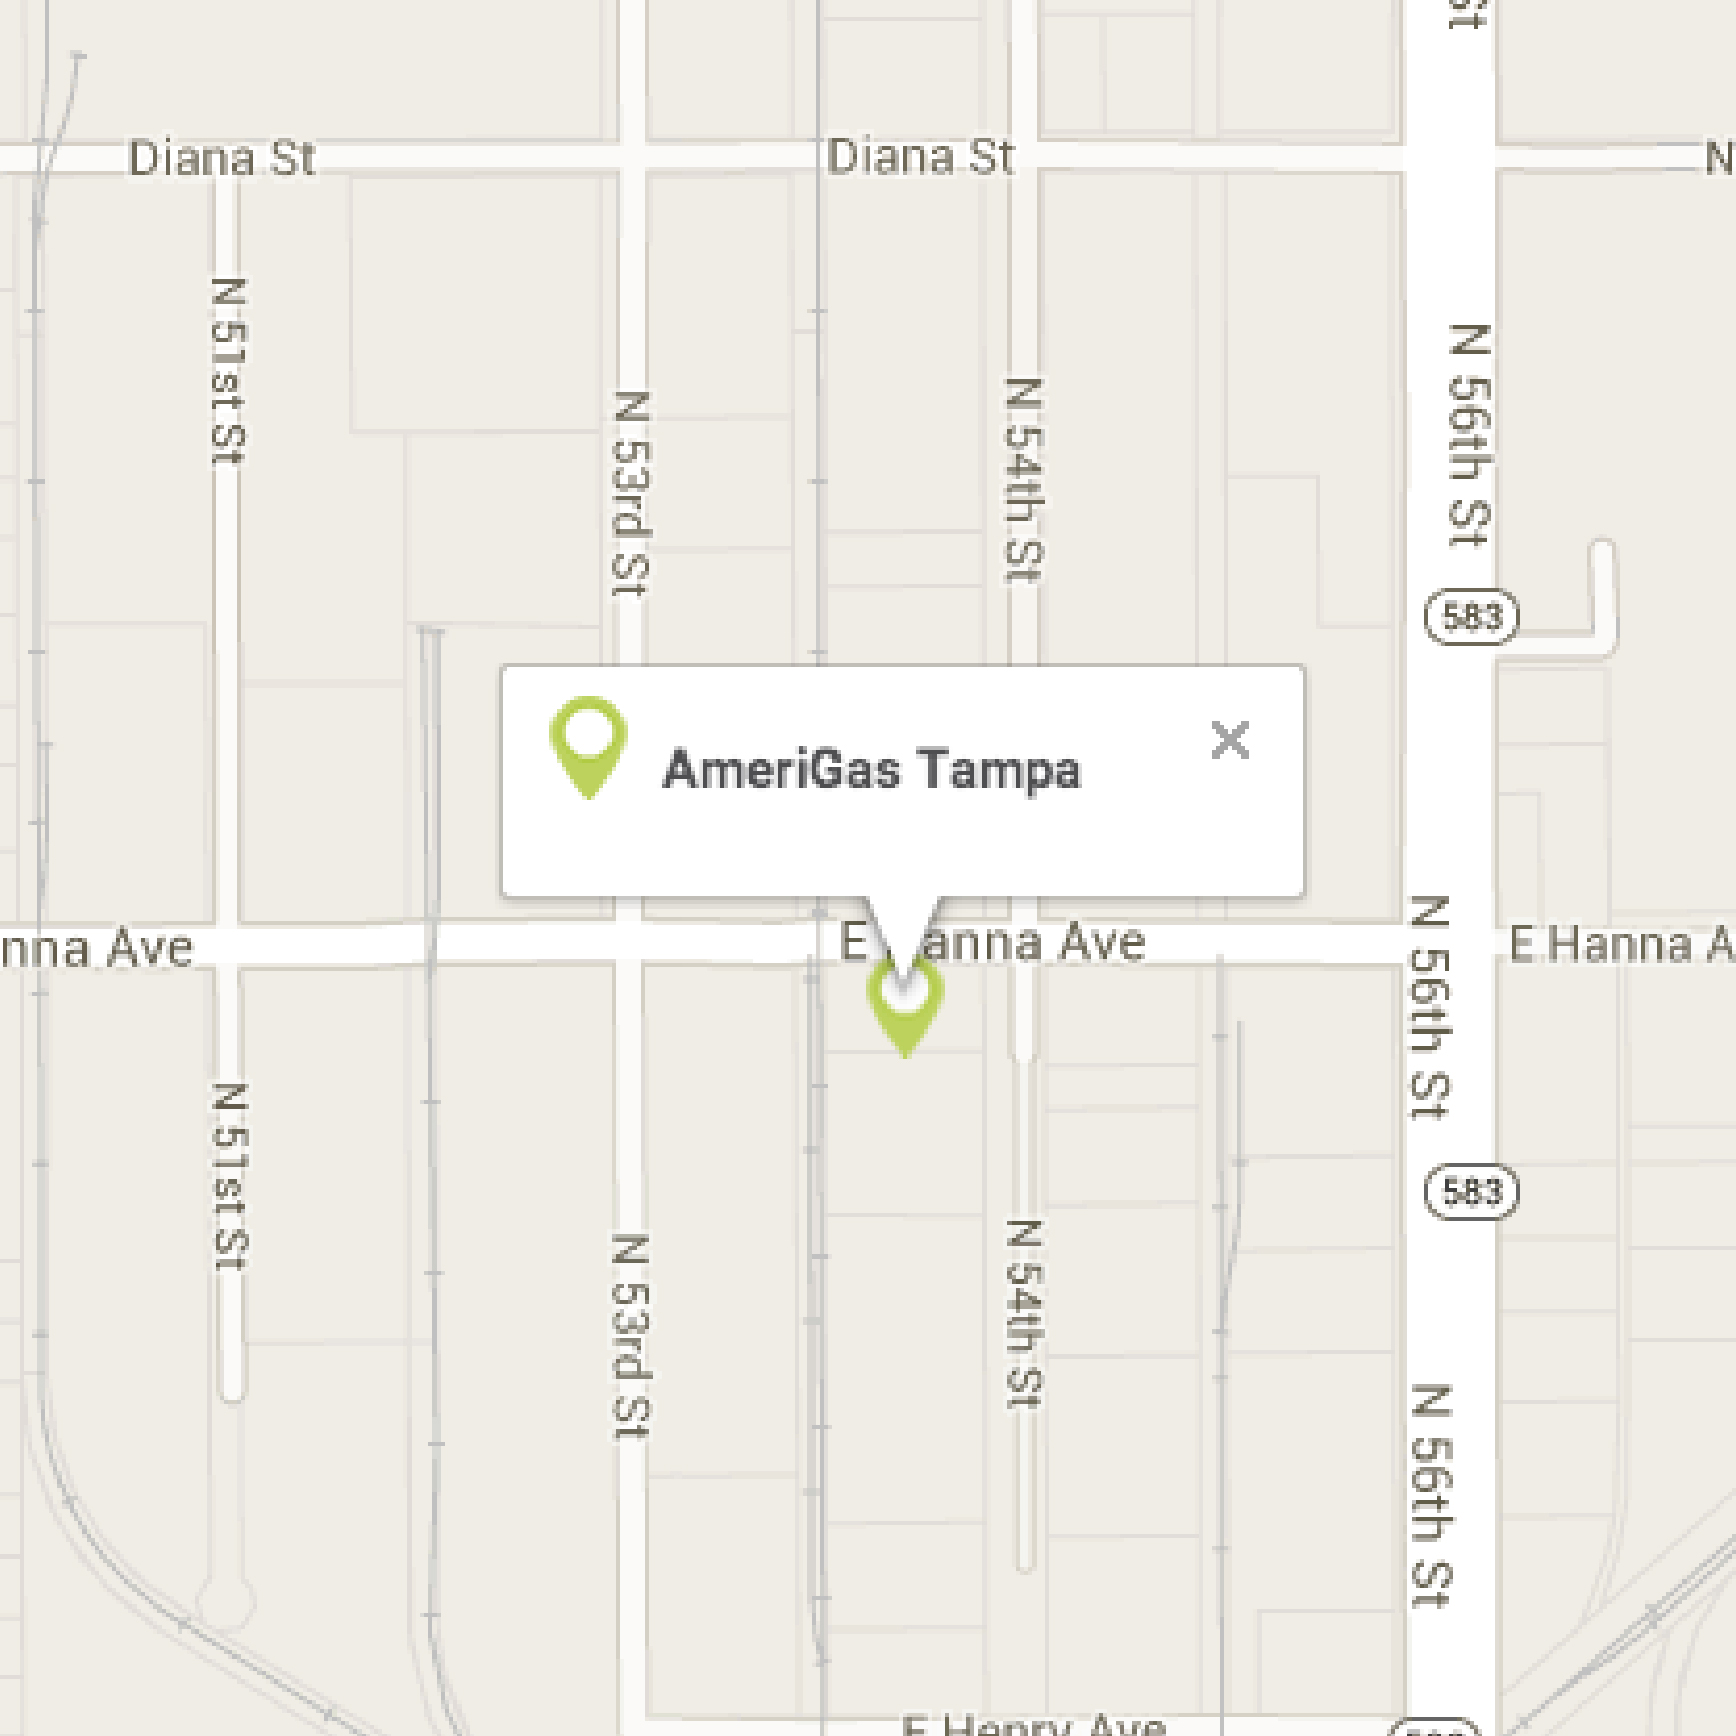
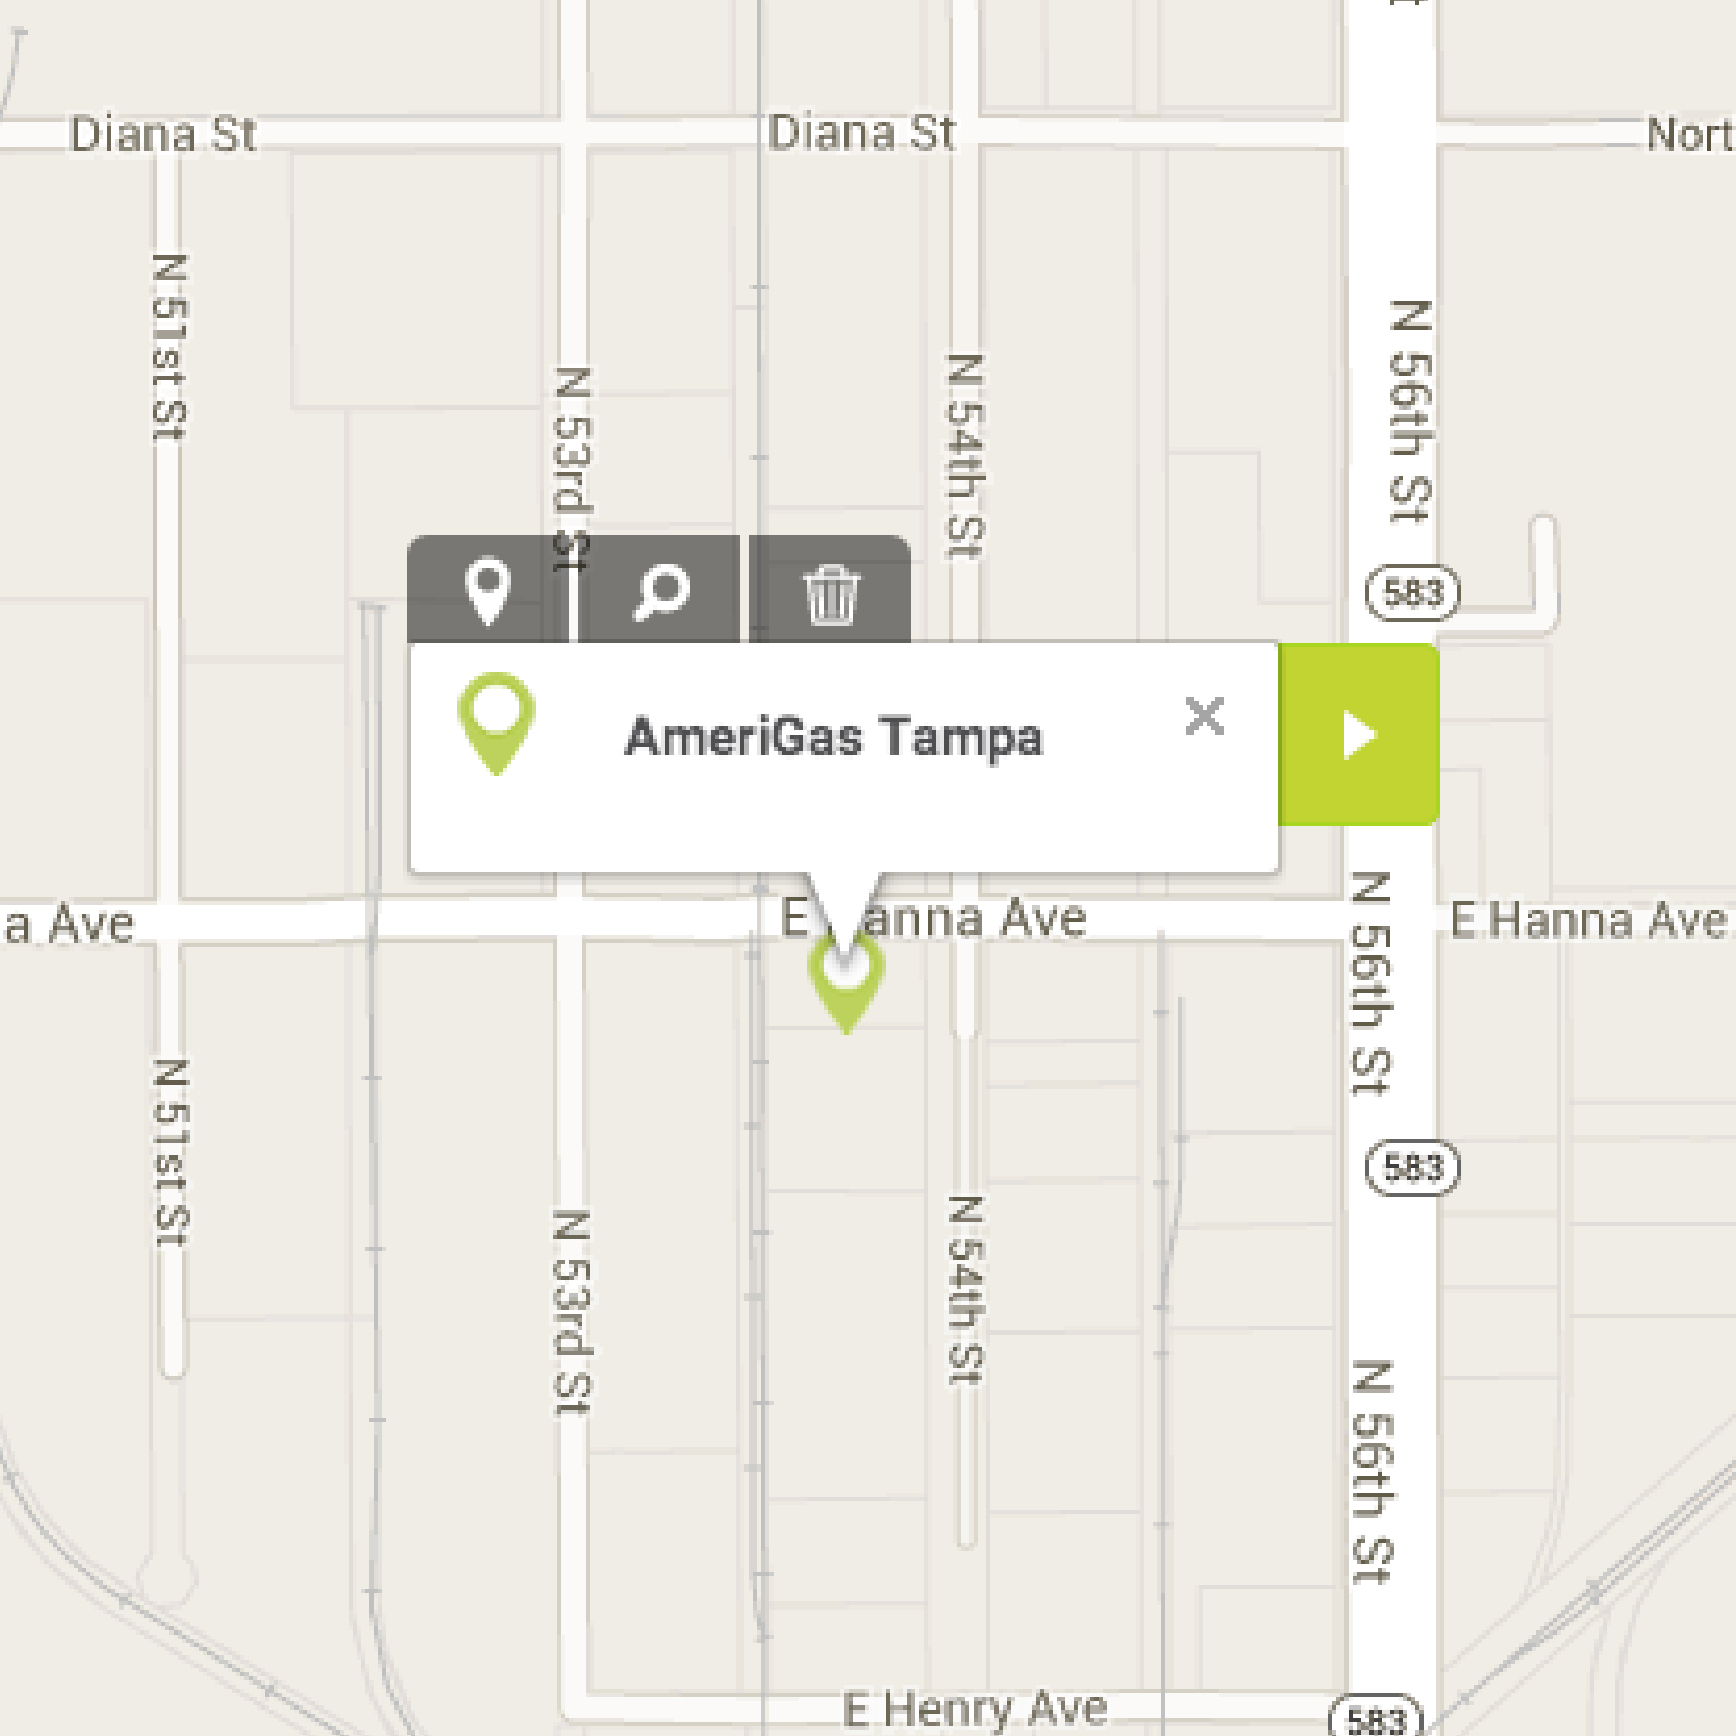
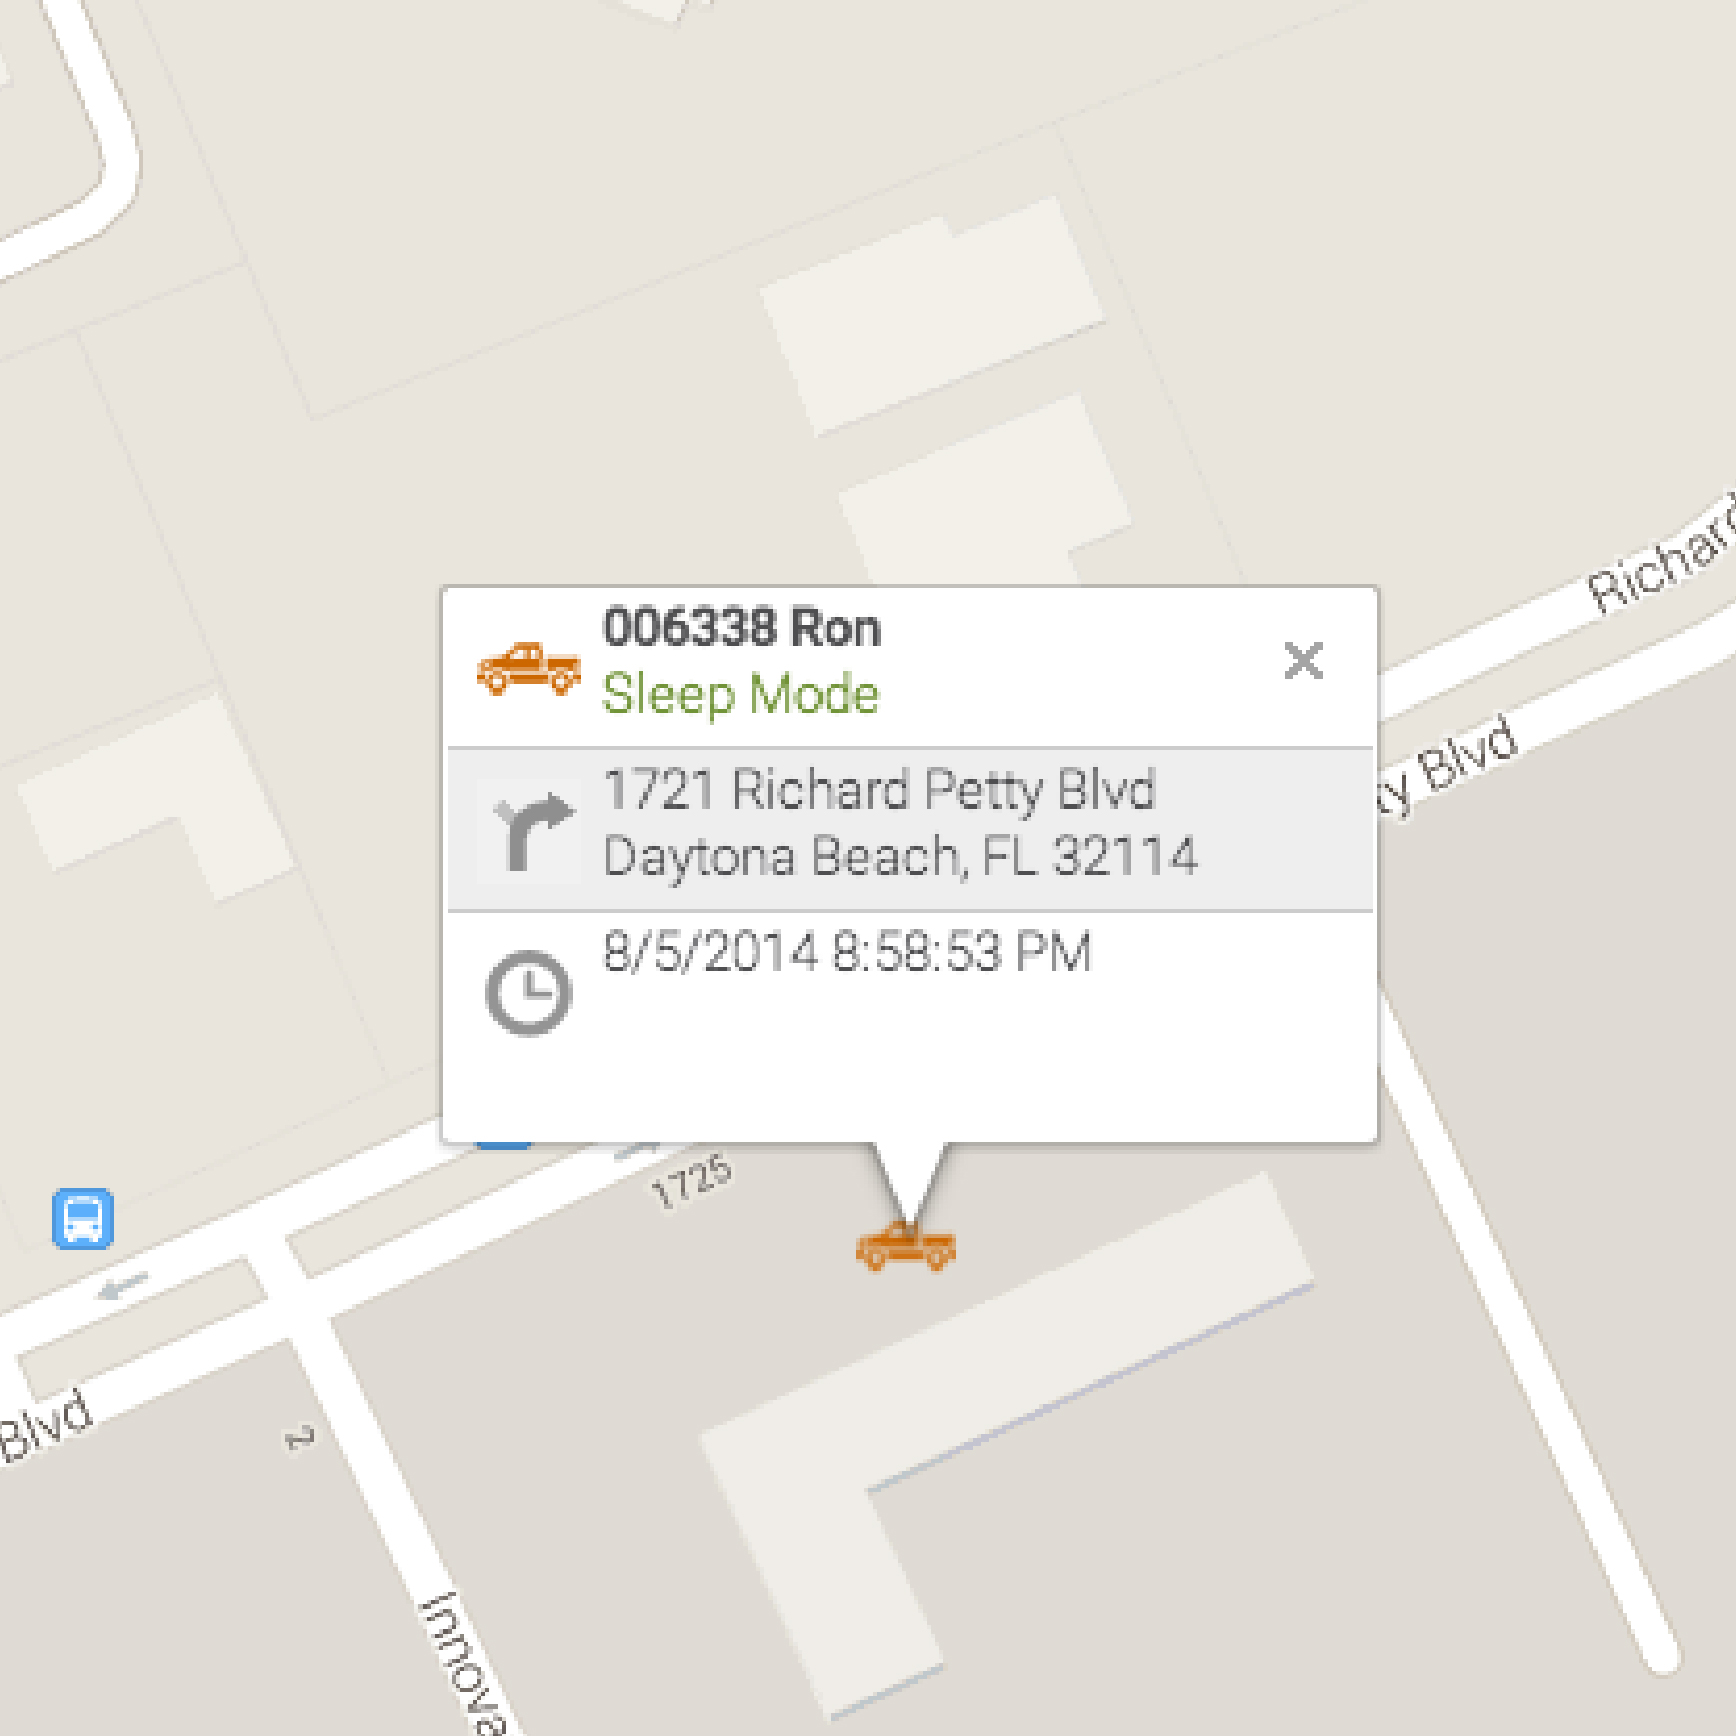
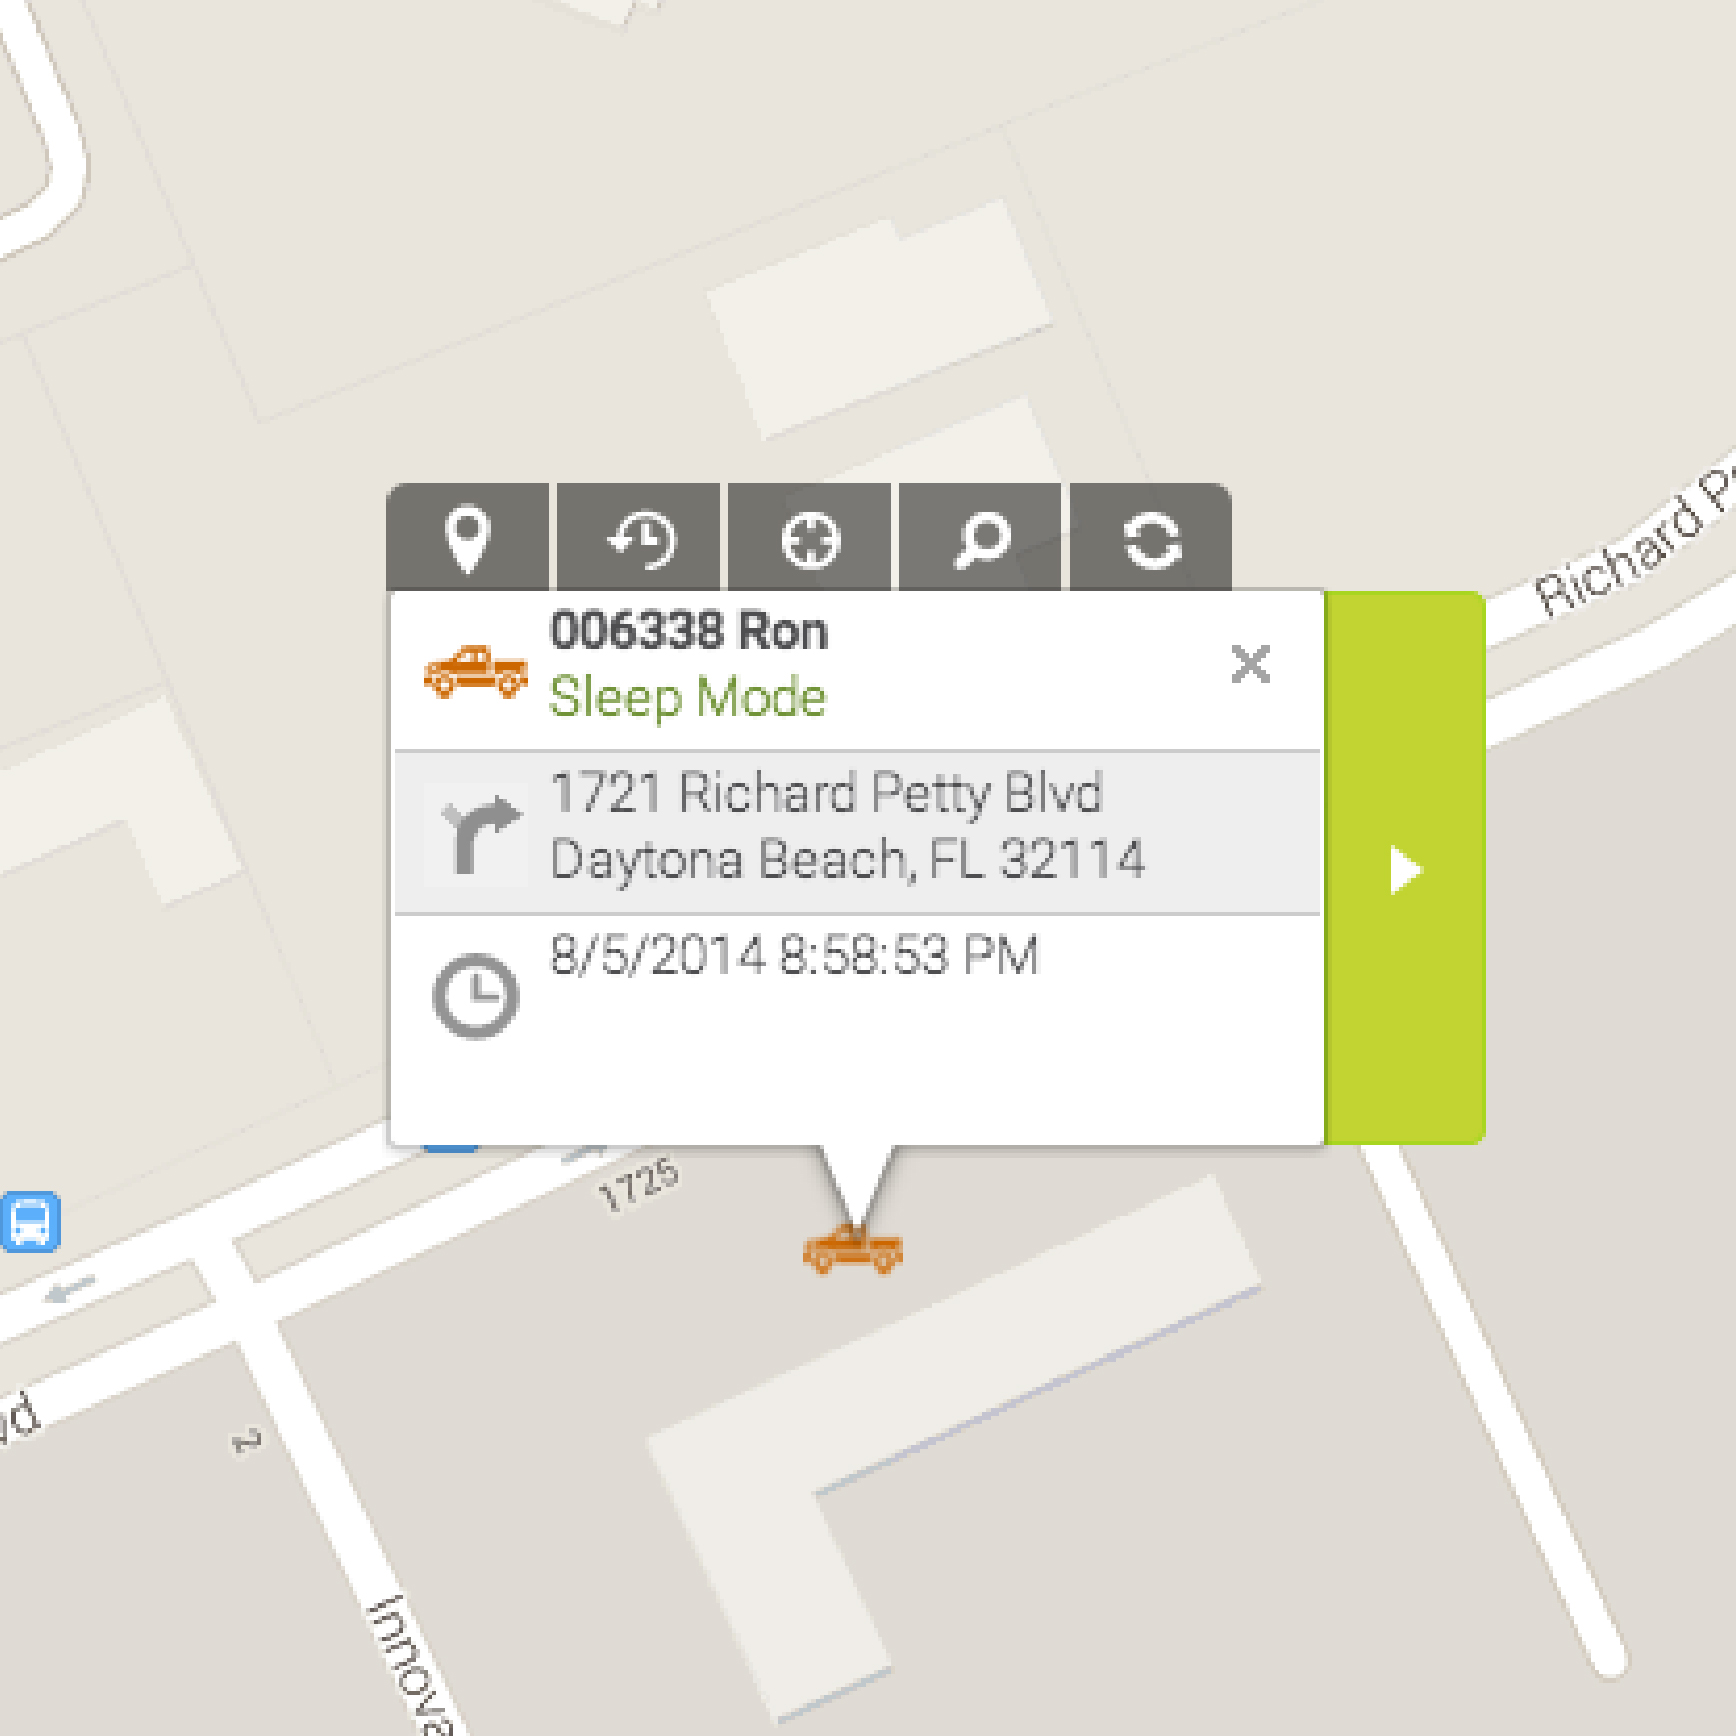
- Hover/ Click – View detail box for unit displaying Name/Status/Address/Timestamp. Click - Opens the quick links and actions button.
 |
|
| landmark-hover | landmark-click |
 |
|
| vehicle-hover | vehicle-click |
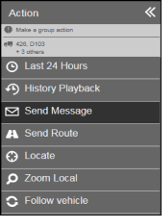
- Action Panel – Actions can be applied to a vehicle, landmark or group. Only certain actions can be taken depending on the selection:
- Comments
- Nearest
- Send Message (Professional Edition)
- Send Route (Professional Edition)
- Last 24 Hours
- History Playback
- Follow Vehicle
- Locate
- Zoom Local
- Driver Logout (Professional Edition)
- Selection Panel – Toggle between vehicle and landmark using the radio buttons. View Sub-Fleet groups and vehicle details, landmark groups and details or search a new address. Select multiple vehicles or landmarks to take a group action.
- Tile Panel – View and manage map tiles in the tile panel. Switch between tiles in collapsed or expanded view or view all map tiles in a grid.
- Data View – Data tables with real time updates. Switch between data tabs to view different data sets, take an action from a unit in data view. Maximize or minimize to maximize performance.
Action Panel
Once a vehicle or landmark is selected you can perform actions by vehicle, landmark or group. You will see direct impact of any action on the main view. Actions will vary depending on edition and selection. Information box will display details about the selected unit or group.
| Vehicle Actions | Landmark Actions | Group Actions |
|---|---|---|
| Comments Last 24 Hours History Playback Nearest
Send Route Locate Zoom Local Follow Vehicle |
Nearest Delete Zoom Local |
Last 24 Hours History Playback Send Message Send Route Locate Zoom Local Follow Vehicle |
Comments Opens a comment modal where users can view the comments associated with the selected vehicle. Comments can be added in the Control Panel.
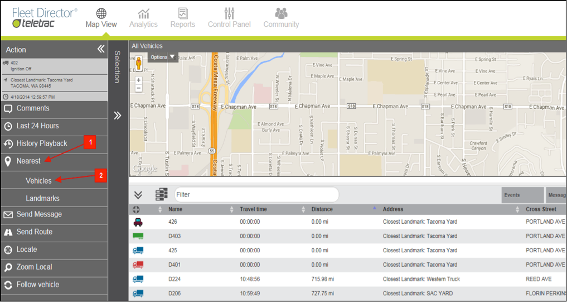
Nearest Queries an entire fleet to find the nearest vehicles to a Landmark, address or another vehicle. Distance and current traffic conditions from Traffic.com are considered by Fleet Director when calculating the nearest vehicle’s proximity. To access the Nearest feature to find the closest vehicle to a landmark:
- Click on the Nearest icon
- Click on Vehicles or Landmarks
The list of the 20 closest vehicles is sorted by time and then distance on the Nearest Tab in the Data View tab providing vehicle name, travel time, and distance.
Send Message Sends messages directly to a driver’s in-cab display. This feature is used to quickly communicate customer and location details, route updates or emergencies to their drivers. Messages are available in the following forms:
- Two-Way Messaging sends canned, form-filled and free text to one or multiple drivers from dispatch.
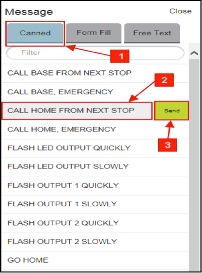
- Canned Messages are pre-defined or customizable messages that are instantly available for fast and convenient two-way communication
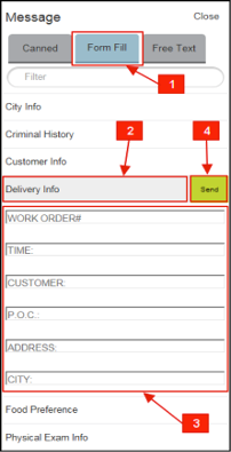
- Form-filled Message or Templates are easy to use and ideal for sending varying details in a common format either by the driver or dispatch
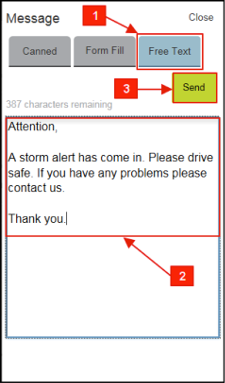
- Free-text Messages allows users full flexibility (up to 500 characters), equivalent to sending an SMS. This feature works from dispatch to vehicle or vice-versa but does not work from vehicle to vehicle.
To access the Message feature:
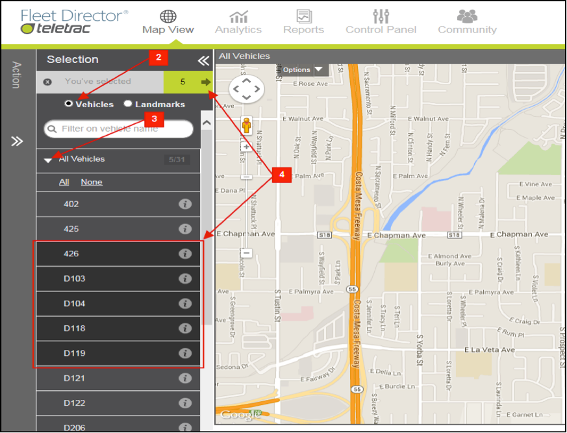
- Click on the Selection Panel
- Verify selection is on Vehicles
- Search for a sub-fleet, a specific vehicle or multiple vehicles by clicking on the drop down icon and scrolling through the vehicle list or typing the name in the search box
- Click on the vehicle, sub-fleet or all vehicles. The vehicle(s) will highlight and the green selection field will start a count. (If selecting All Vehicles first click on the All Vehicles drop down arrow and then click All or if you are selecting a sub-fleet first click on the sub-fleet drop down arrow and then click All)
- Click on the Action Panel or the green Selection field.
Note: These first five steps are required whether you are sending a Canned, Form-filled, or Free-text Message.
Once in the Action panel you can select Send Message
Canned Messages
- Click on Canned
- Select the message needed to be sent
- Click Send
Form Fill Message
- Click on Form Fill
- Select the message needed to be sent
- Fill out the appropriate fields
- Click Send
Free Text
- Click on Free Text
- Type the message for the driver. (500 character max.)
- Click Send
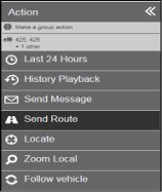
Send Route allows users to remotely program destinations to their driver's in cab display, providing turn-by-turn navigation to new locations or job sites. The feature allows to send a destination to a driver by Address or Landmark.
- To access this feature you must first select the vehicle
- Click on Selection Panel
- Verify selection is on Vehicles
- Search for a sub-fleet, a specific vehicle or multiple vehicles by clicking on the drop down icon and scrolling through the vehicle list or typing the name in the search box.
- Click on the vehicle, sub-fleet or all vehicles. The vehicle(s) will highlight and the green selection field will start to count. (If selecting All Vehicles first click on the All Vehicles drop down arrow and then click All or if you are selecting a sub-fleet first click on the sub-fleet drop down arrow then click All)
- Click on the Action Panel or the green Selection field.

Once in the Action panel you can select Send Route
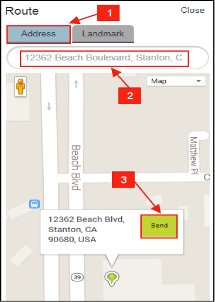
- To Send Route by Address
- Click on the Address tab
- Enter Address and select the correct address from the list of options provided if more than one is presented.
- Click Send
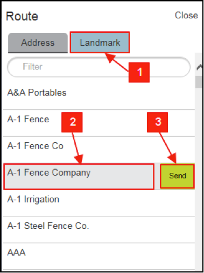
- To Send Route by Landmark
- Click on the Landmark tab
- Choose Landmark from list (The Filter option may be used)
- Click Send
Last 24 Hours allows users to view a playback of the vehicle history for the last 24 hours. A new map will open in a map tile with a playback animation of the trip.
Follow Vehicle can be used to track a vehicle(s) in a new map tile.
Locate Gives a user the ability to locate an entire fleet, sub-fleets, selected vehicles or a single vehicle on demand.
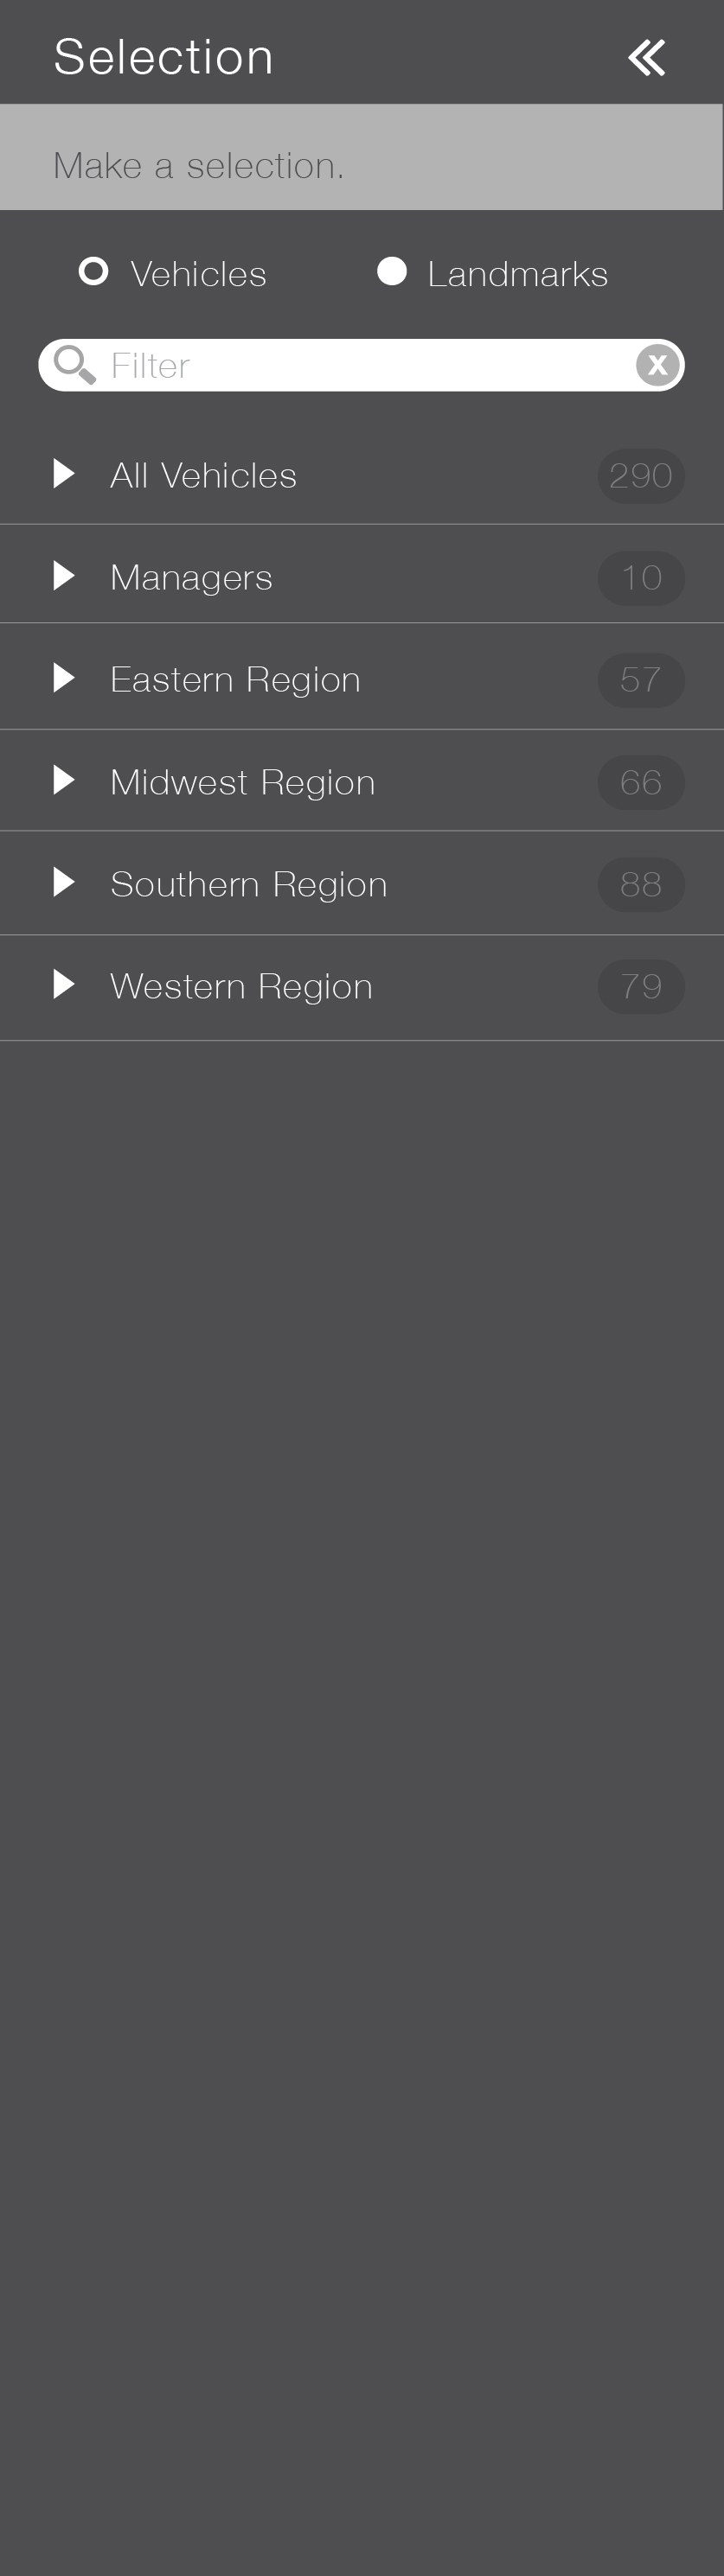
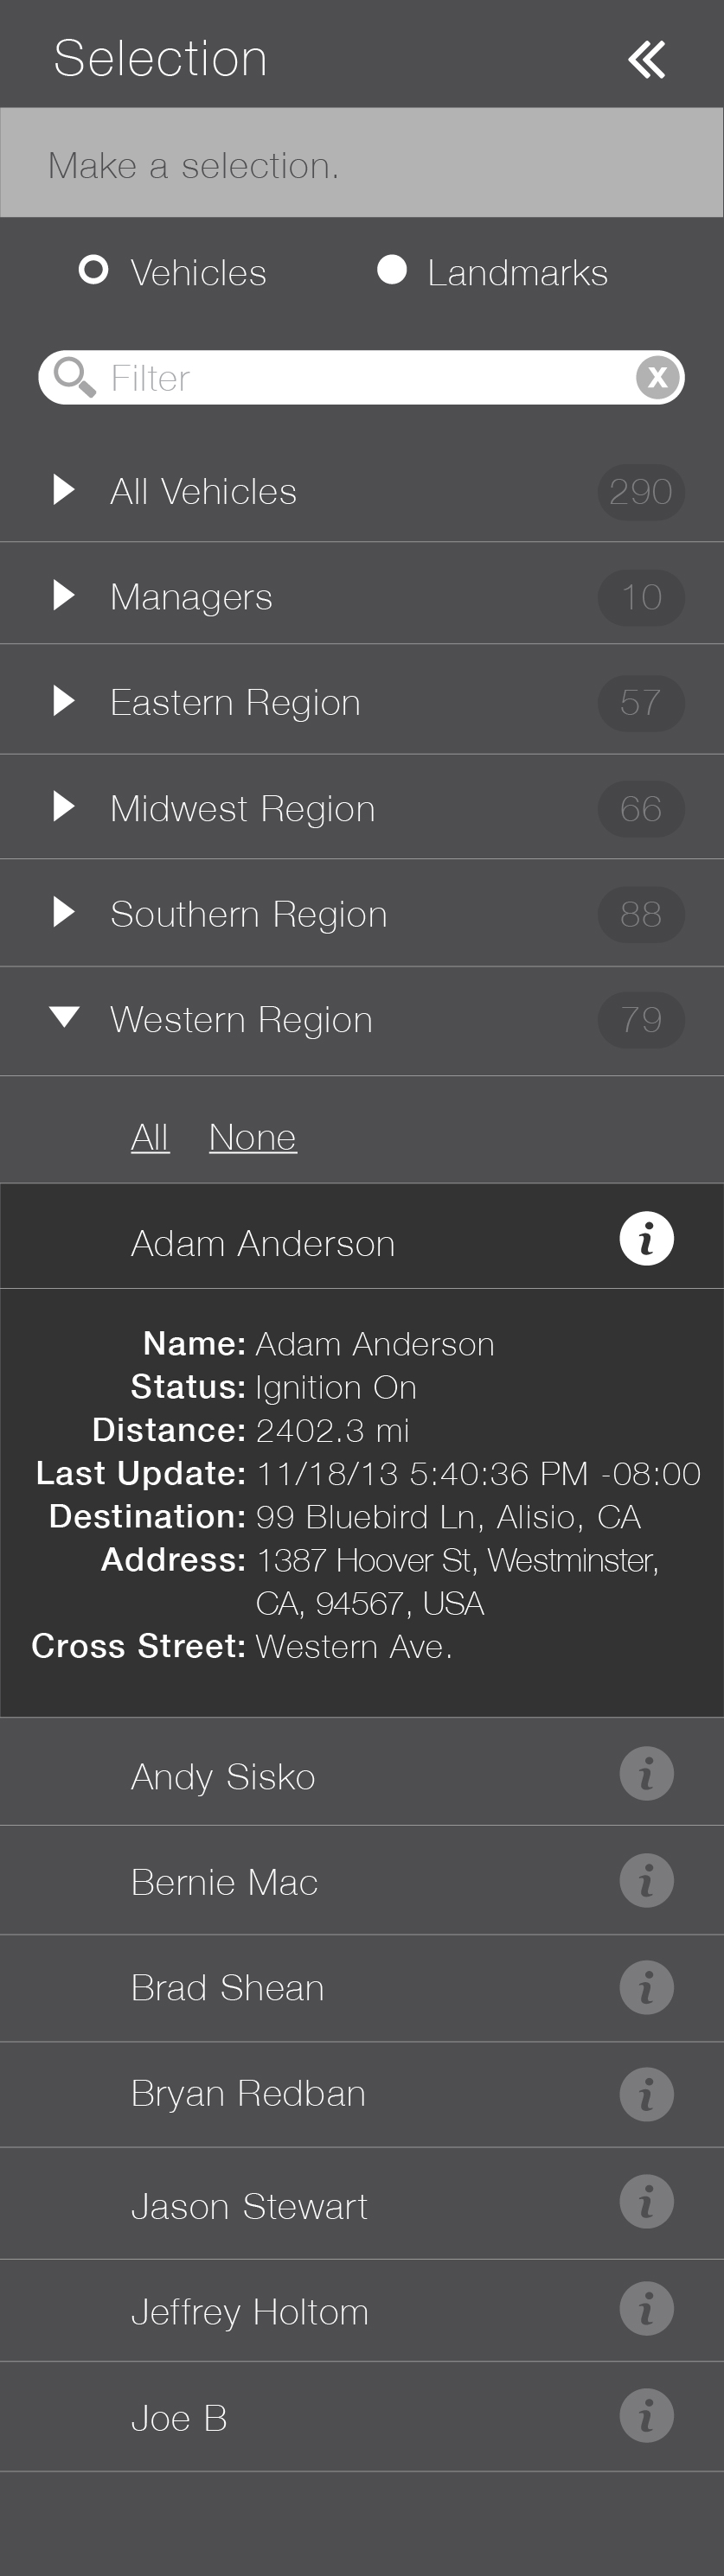
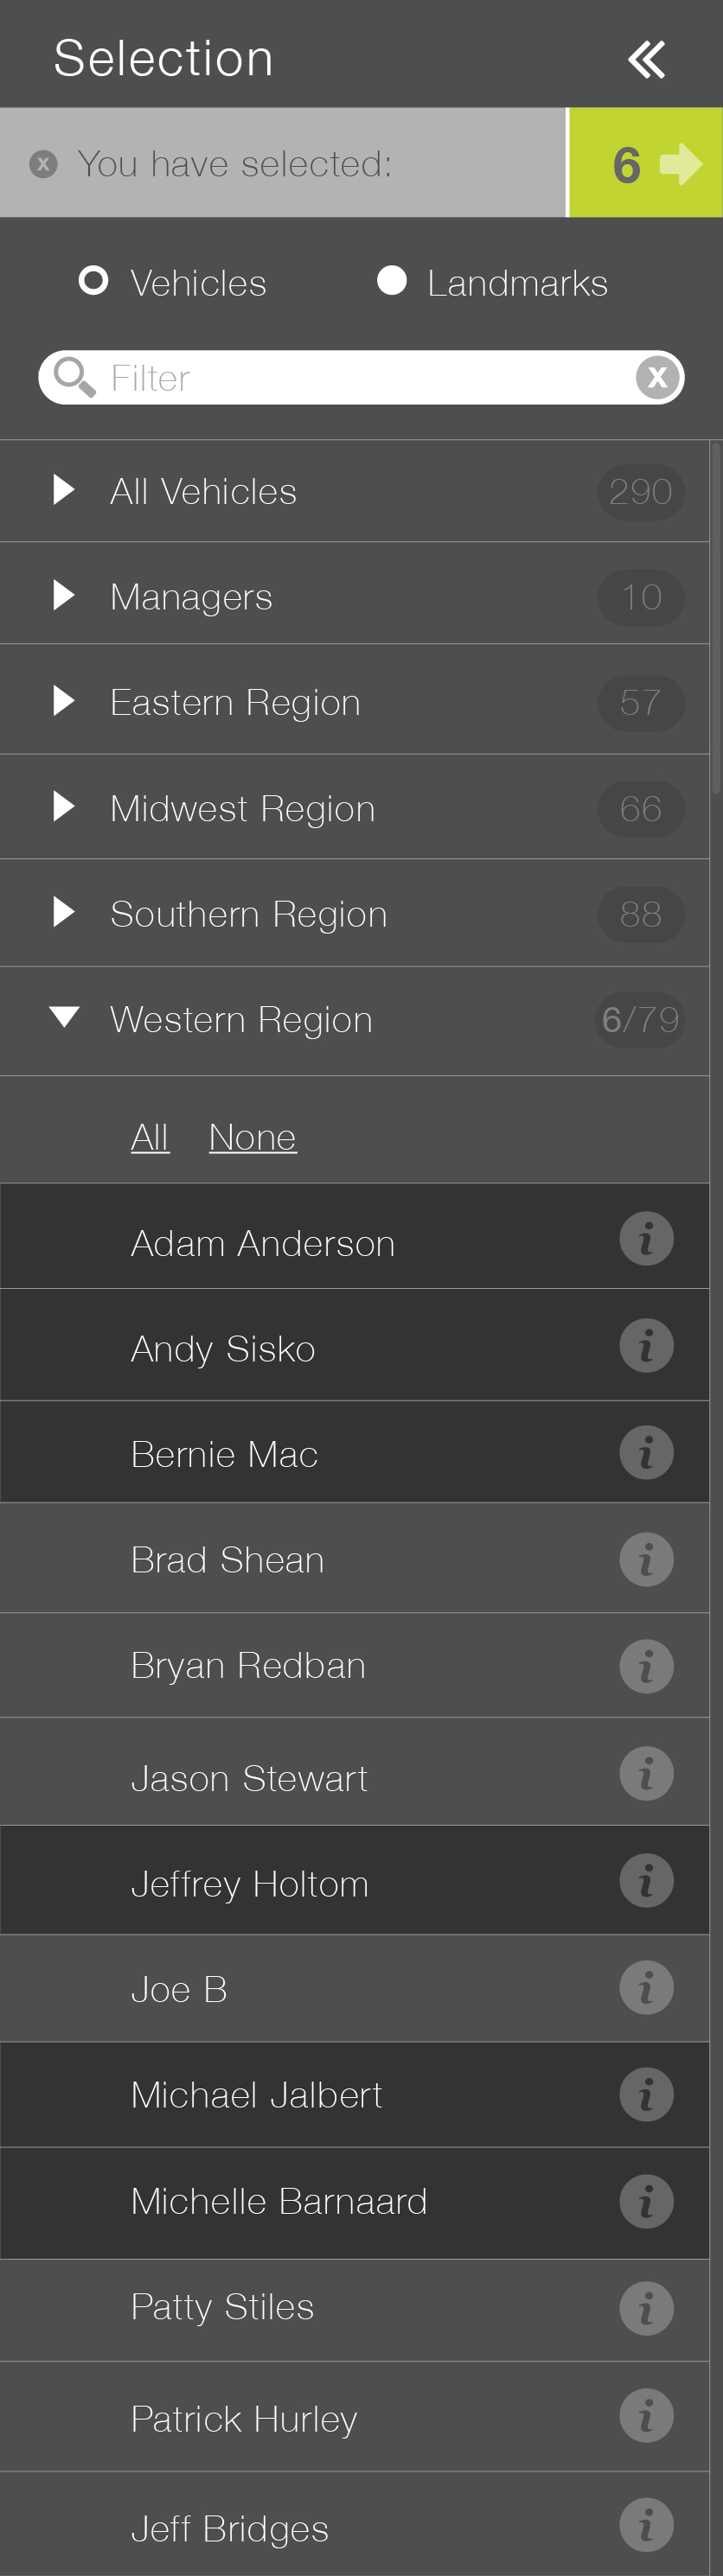
Selection Panel
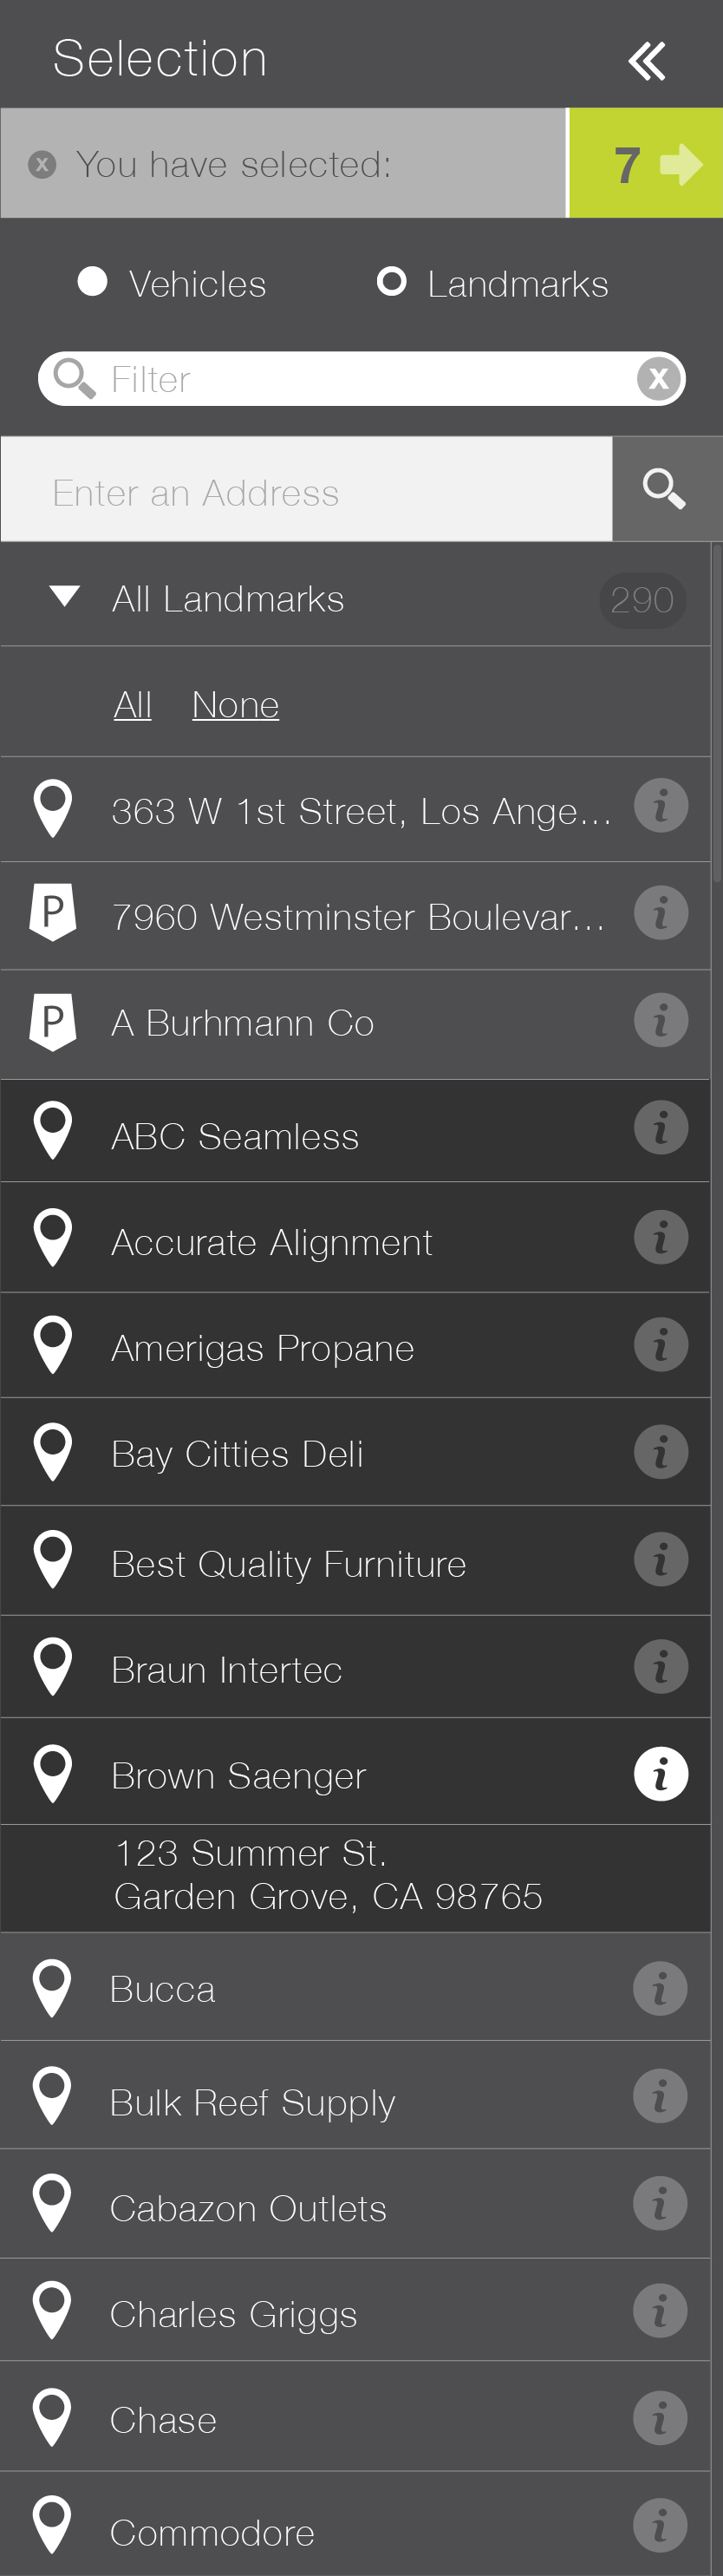
Toggles – Toggle between Vehicle and Landmark lists using the radio buttons.
Filter – Filter or search for a vehicle or landmark in the active list using the filter bar.
Sub Fleets/ Landmark Groups – Vehicles and landmarks are grouped together in drop-down lists. Expand the group to select individual units or all the units in the group.
Details – View unit details (status, distance, destination and address), by selecting the “i” button.
Address – Search an unsaved address in the first row of the “Enter Address” bar in the landmark list and take an action on that address.
Select – Select a landmark/vehicle or group of vehicles (selected units are highlighted and the number of selected vehicles is displayed in the green action area. Select row and click again to deselect.
Clear – Select “x” button to clear entire selection.
Action – Select green button to take an action on the selection.
- Vehicle Actions
- Landmark Actions
- Group Actions
 |
 |
 |
 |
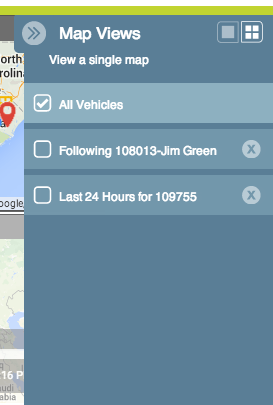
Tile View
Tiles – Multiple maps can be viewed on the Map View using the tiles panel. Each map tile displays the name of the map/ action and the name of the unit or number of units selected. You can expand to a new browser by using the expand icon and close the tile by selecting the Close icon.
Tile Panel – Expand and collapse the map tile panel on the right side. View, reorder and close what maps are open in the map list when the panel is expanded. When the tile box is collapsed, mouse over the tile box to see the name of the map.
Single Map – View a single map tile at a time.
Multiple Maps – View multiple maps in tiles.
Data View
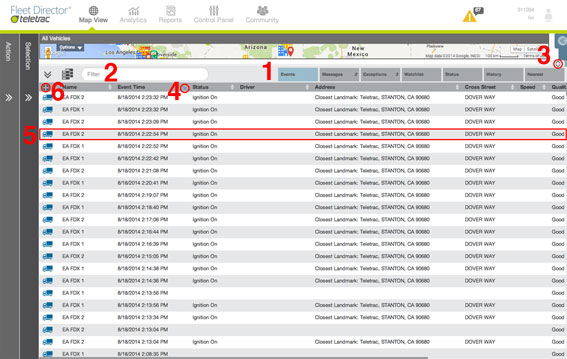
- Tabs – Data View tabs allow users to switch between different data categories
- Events, Messages, Exceptions, Watch list, Status, History, Nearest. The numbers of pending notifications are displayed next to the tab title in italics. Users can show/hide any of the data tabs by closing the tab with the “x” button and then repopulating the tabs with the “+” button that appear when you hover over the individual tab.
- Filter – Live filter/search the current data view.
- Resize – Resize by dragging the top bar, minimize by selecting the down arrow or maximize by selecting the data view icon.
- Sort – Sort data view by any column in ascending or descending order by selecting the title of the column to sort. The highlighted arrow indicates the sort column and the order.
- Select – Select any unit displayed in the Data View by selecting the row, this will then activate the unit so user can take an action. Only one unit can be selected at a time in Data View.
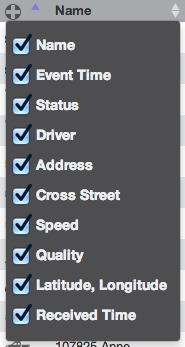
- Column Settings – Select the “+” arrow in the first column of the data view. Toggle on/off any of the columns in the current data view.
Analytics
Fleet Analysis Dashboard
Fleet Analysis Dashboard – High-level overview of Fleet performance broken down into several sub dashboards.
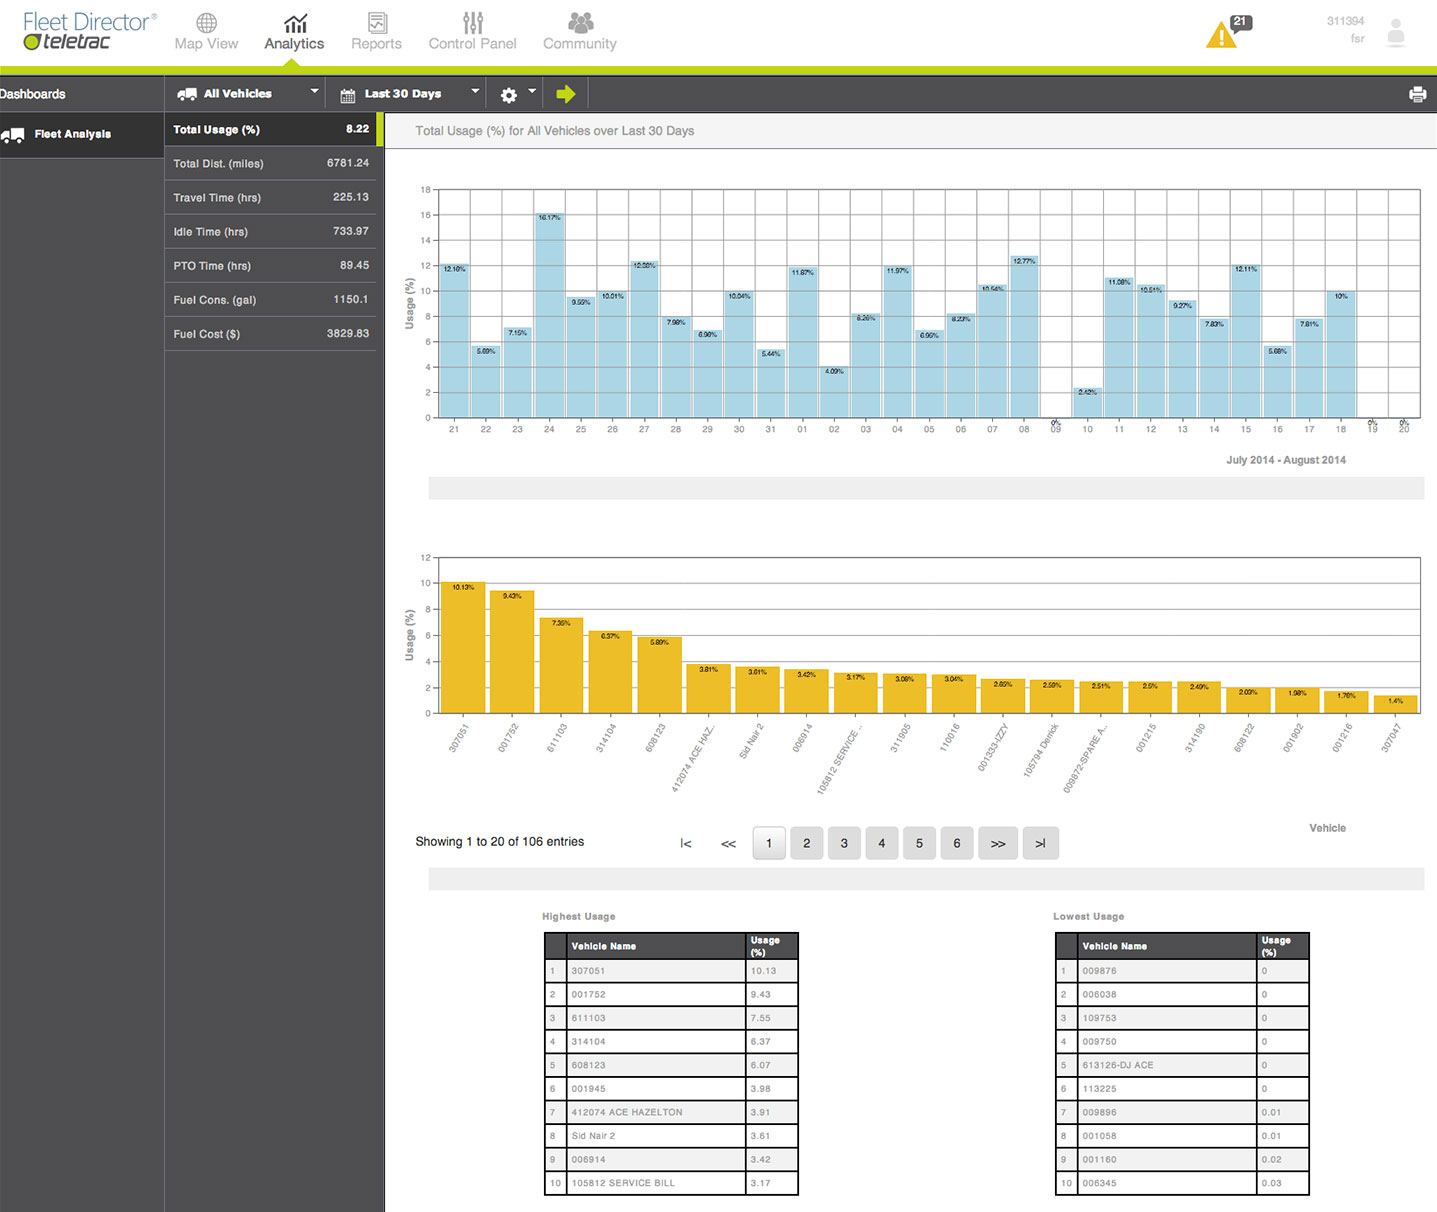
Fleet Analysis Dashboard contains the following sub dashboards:
- Total Usage (%) – Percent of time spent travelling or in PTO (Power Take Off).
- Total Distance (miles) – Total distance travelled in miles.
- Travel Time (hrs) – Total travel time in hours.
- PTO Time (hrs) – Total PTO (Power Take Off) time in hours.
- Idle Time (hrs) – Total idle time in hours.
- Fuel Consumption (gal) – Total fuel consumption in gallons.
- Fuel Cost ($) – Total fuel cost in dollars.
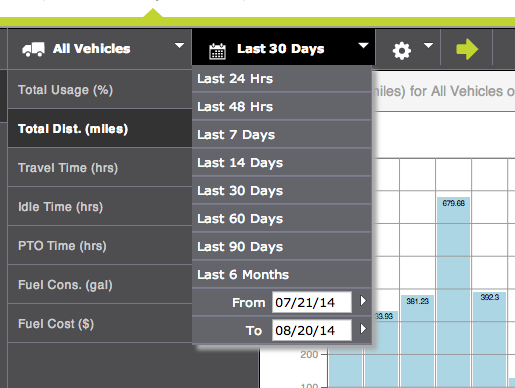
Edit Parameter settings in the tool bar at the top.
- Select a sub-fleet or vehicle from the Vehicle drop down menu.
- Select a date range from the Date drop down.
- Select green check button to submit selection.
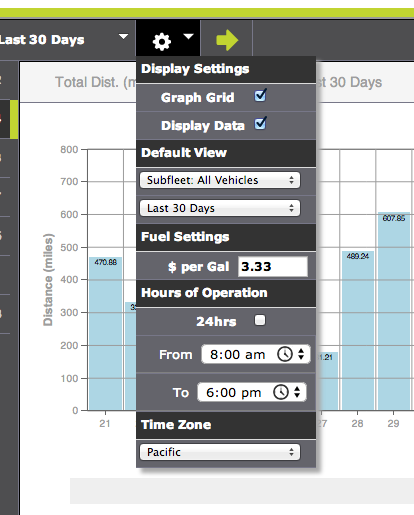
Settings
Users can edit settings and save their default dashboard view in the settings drop down. User can save default settings, which are linked the user ID and will display on next log in.
Display Settings
- Graph Grid: Toggle on/off the grid lines on the graphs.
- Display Data: Toggle on/off the actual values within the bar graphs.
Default View:
- Vehicles: Select a Sub-Fleet or Vehicle from the drop down menu.
- Date: Select a date range form the drop down menu.
Fuel Settings:
- Gas Price: Set the $ price per gallon for fuel data.
Hours of Operation:
- Enter the hours of operation for the fleet, or select 24 hours.
Time Zone:
Set default time zone.
- Select the settings icon from the top menu.
- Edit settings
- Select green check icon to save settings.
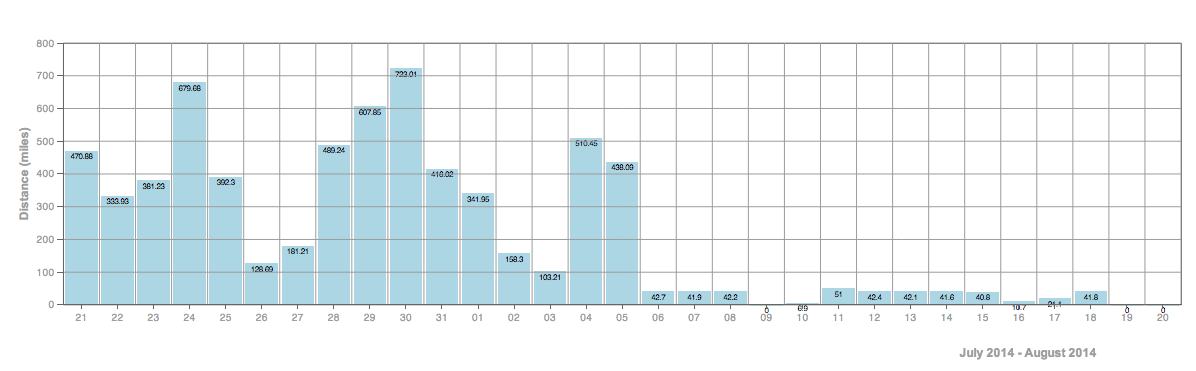
After making any edits to the parameter settings the data in all sub dashboards will adjust to reflect the new vehicle and date selection. Within each sub dashboard the data set is broken down into 3 graphs.
Bar Graph by Time: Displays data set in chronological order for the time period selected. This graph is drillable, by selecting on one of the bars, you can drill down into that time range, the data will be adjusted in the Vehicle and Table Ranking graphs below.
Bar Graph by Vehicle: Displays data by vehicle in descending order. Page through the list using the arrows or page numbers.
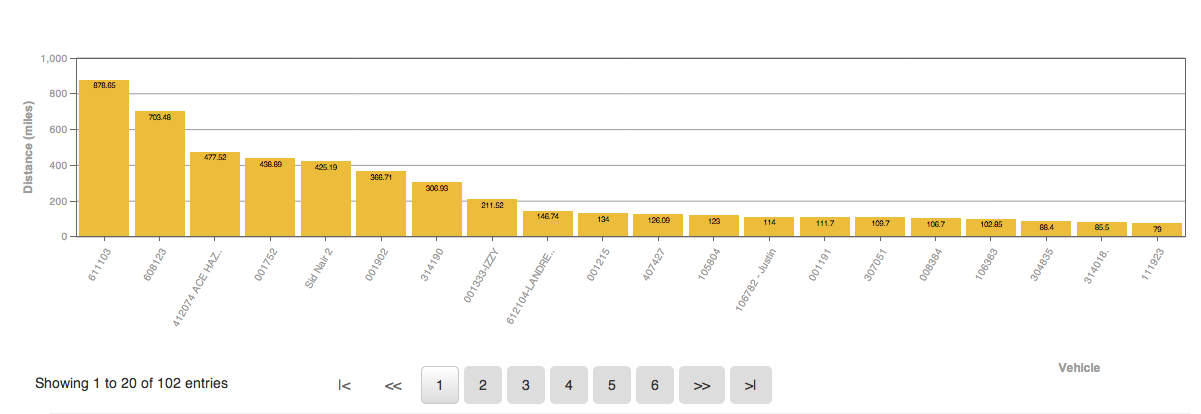
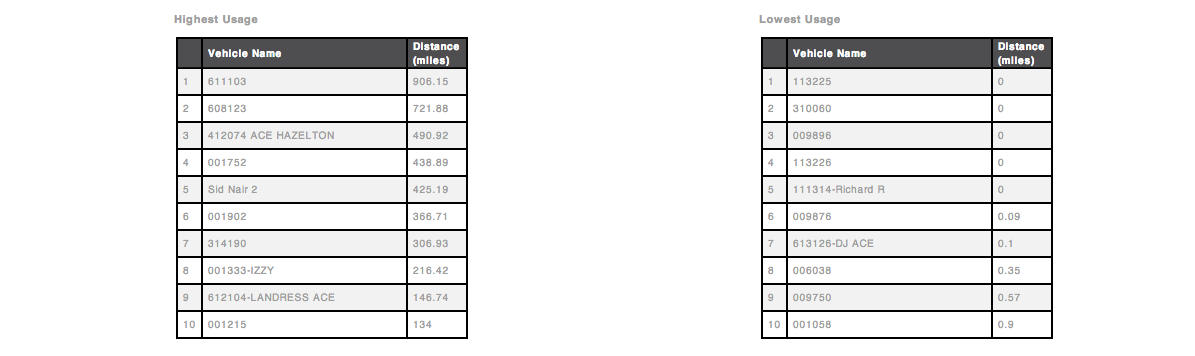
Ranking Tables: Displays the top and bottom 10 vehicles for the data set.
Reports
Reports
Reports Dashboard
There are three levels of report packs available for purchase.
- Standard
- Professional
- Enterprise
Each level of reports will include the reports provided in the pack above it. Please see the Vehicle Reports Section for the types of reports avaiable in each report pack.
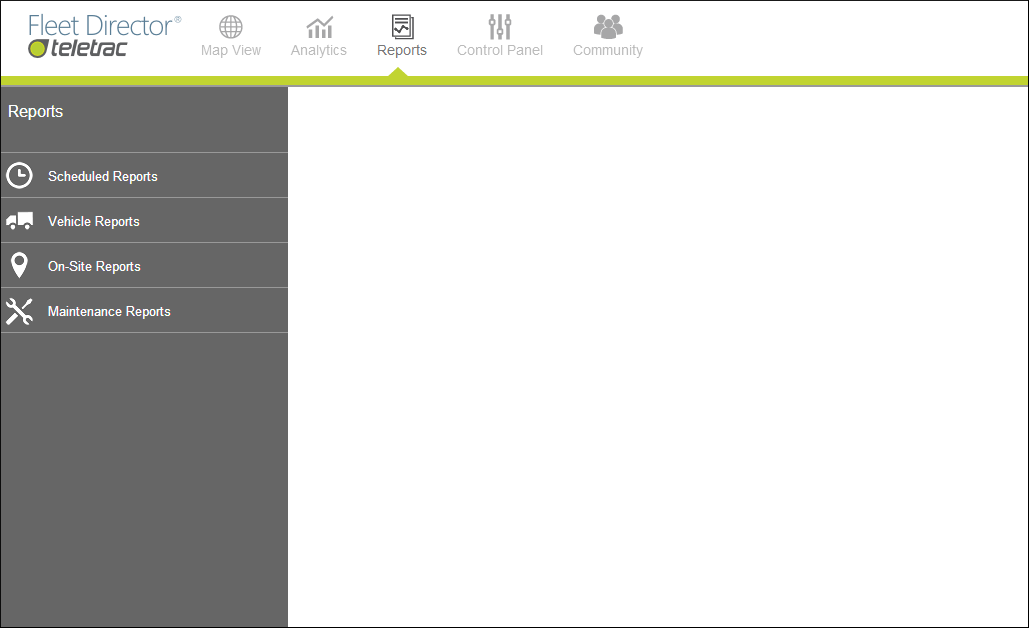
The Reports section allows you to schedule reports to run Monthly, Weekly, or Daily as well as run them on demand. The Reports section has the following categories to choose from:
- Scheduled Reports
- Vehicle Reports
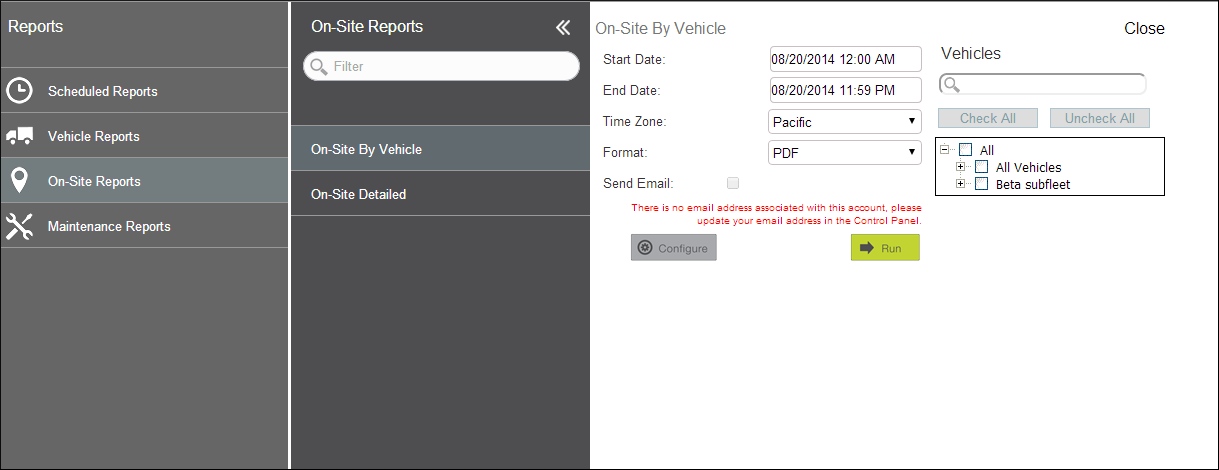
- On-Site Reports
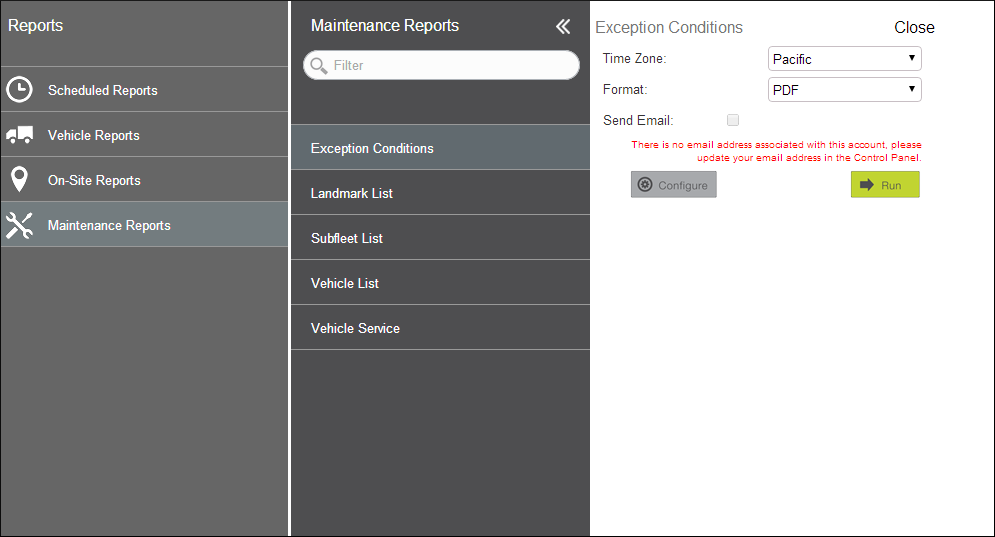
- Maintenance Reports
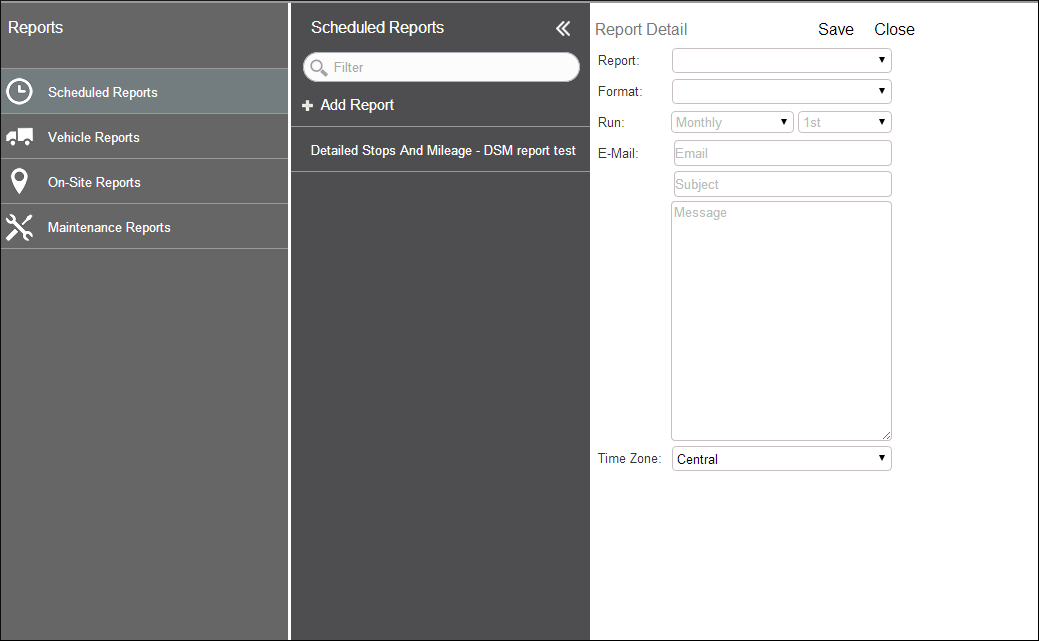
Scheduled Reports
In the Scheduled Reports section you can either Add Report (by clicking + Add Report) and set up your report parameters or you can select a saved report from the list to alter the previously set parameters, click Save after making any changes to existing reports or after creating a new report.
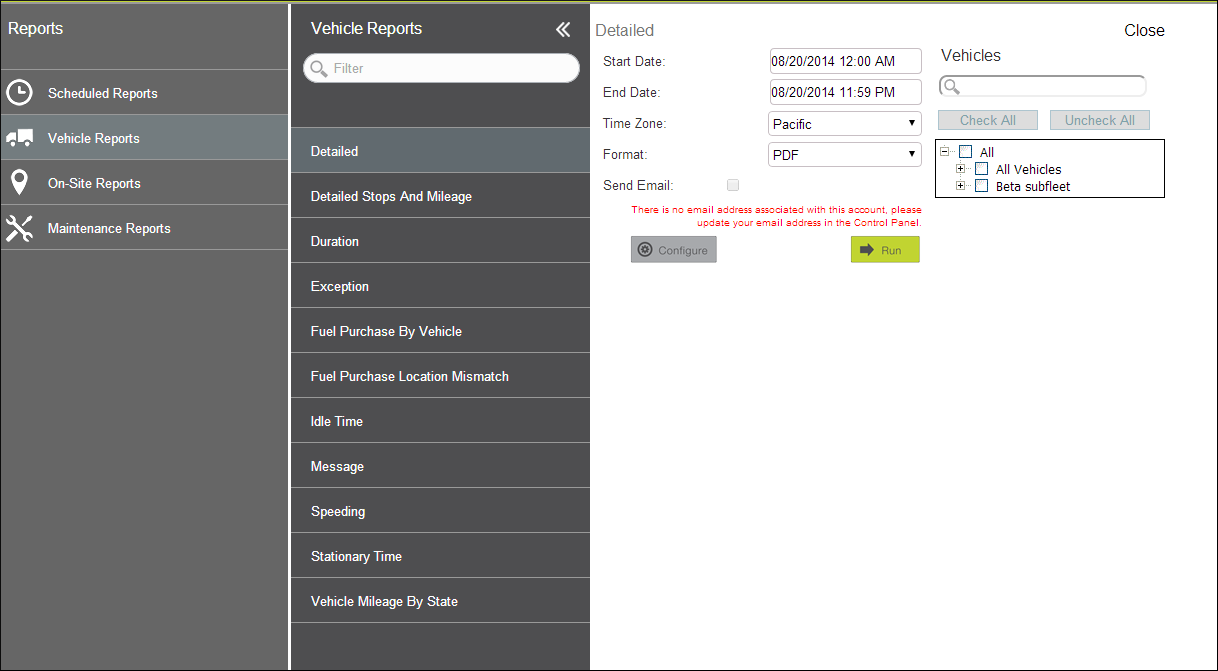
Vehicle Reports
The following reports are available when clicking on Vehicle Reports:
| Report Pack | Report |
|---|---|
| Enterprise Pack | Catastrophic Vehicles Event |
| Standard Pack | Daily Driver Summary |
| Standard Pack | Detailed |
| Standard Pack | Detailed Stops and Mileage |
| Professional Pack | Driver Summary |
| Professional Pack | Duration |
| Standard Pack | Exception |
| Standard Pack | Fuel Purchase by Vehicle |
| Standard Pack | Fuel Purchase Location Mismatch |
| Standard Pack | Idle Time |
| Standard Pack | Message |
| Standard Pack | Speeding |
| Standard Pack | Stationary Time |
| Enterprise Pack | Vehicle Diagnostic |
| Standard Pack | Vehicle Mileage by State |
The start date, end date, time zone and output file format fields need to be filled out along with selecting the entire fleet, sub fleet(s), or individual vehicles prior to running the report.
Note: Verify that the correct email has been associated with the account prior to running the report. You can make changes or add an email address in the Control Panel.
Control Panel
Control Panel Dashboard
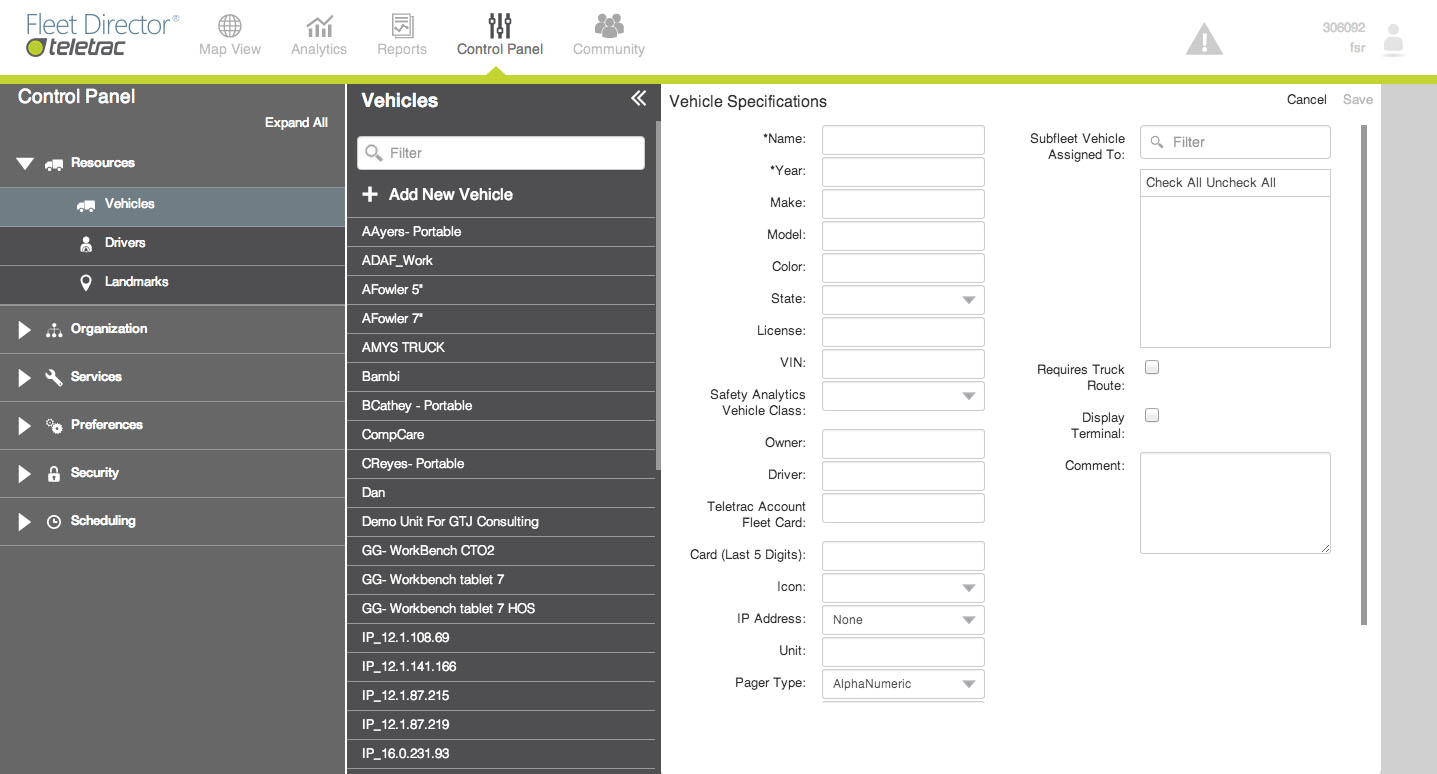
The Fleet Director Vehicles record can be used to name the vehicles within a fleet and store data, such as year, make and model. Once recorded, the vehicle name is listed throughout the software, including the map and Data View Control Panel, and on reports. Under the Vehicles view, users can assign an icon to their vehicle, and use it to view vehicle activity on the map. . There are a number of fields that pertain to specific feature’s that will need to be completed such as Safety Analytics Vehicle Class, Sub Fleet Vehicle Assigned To, Teletrac Fleet Card, and Display Terminal.
On the Reports tab in the Maintenance section the Vehicle List report will display all of the information from the Vehicles record
Resources
Vehicles
To manage all vehicles in your fleet follow the steps below:
Add a new vehicle:
- Select Vehicles from the Resources list.
- Select “+ Add New Vehicle” from the vehicle list.
- Fill out the vehicle information form
- Select Save.
Edit an existing vehicle:
- Select the vehicle from the vehicle list, or search for the vehicle using the filter bar.
- Edit necessary fields in the vehicle information form.
- Select “Save” to keep changes, “Cancel” to discard changes or “Delete” to delete unit from the vehicle list. Confirm deletion by selecting “Delete” from the pop up.

|
FIELD |
DESCRIPTION |
|---|---|
|
Vehicle Name |
Type a unique vehicle name. Duplicate names are not allowed. This is a required field. |
|
Year |
Type the vehicle year. |
|
Make |
Type the make of the vehicle. |
|
Model |
Type the model of the vehicle. |
|
Color |
Type the color of the vehicle. |
|
State |
Select the state from the drop-down menu. |
|
License |
Type the vehicle license number. |
|
VIN |
Click the Advanced link and type the VIN. |
|
Safety Analytics Vehicle Class |
On the drop down menu, click to select vehicle class based upon vehicle weight. |
|
Owner |
Click the Advanced link and type the name of the owner. |
|
Driver |
Click the Advanced link and type the name of the driver. |
|
Teletrac Fleet Card |
Enter the Fleet Card Account number and last 5 digit of fuel card assigned to vehicle. |
|
Comments |
Click the Advanced link and type any comments. |
|
Display Terminal |
Click to check the box if the vehicle is installed with a Vehicle Display Terminal. Allows you to use the Send Message feature and Send Route by right-clicking on Map View tab. |
|
Icon |
On the drop-down menu, click the description of the desired vehicle icon to be displayed in the Map View. |
|
IP Address |
On the drop-down menu, click the IP Address of the unit assigned to the new vehicle. |
|
Unit |
Type the unit ID. |
|
Pager Type |
N/A |
|
Pager ID |
N/A |
|
Sub-fleet Vehicle Assigned To |
Assign a new vehicle to an existing sub-fleet. click the selection box in front of the appropriate sub-fleet |
|
Requires Truck Route |
Enables truck route selections for vehicle navigation with CTO2 hardware. |
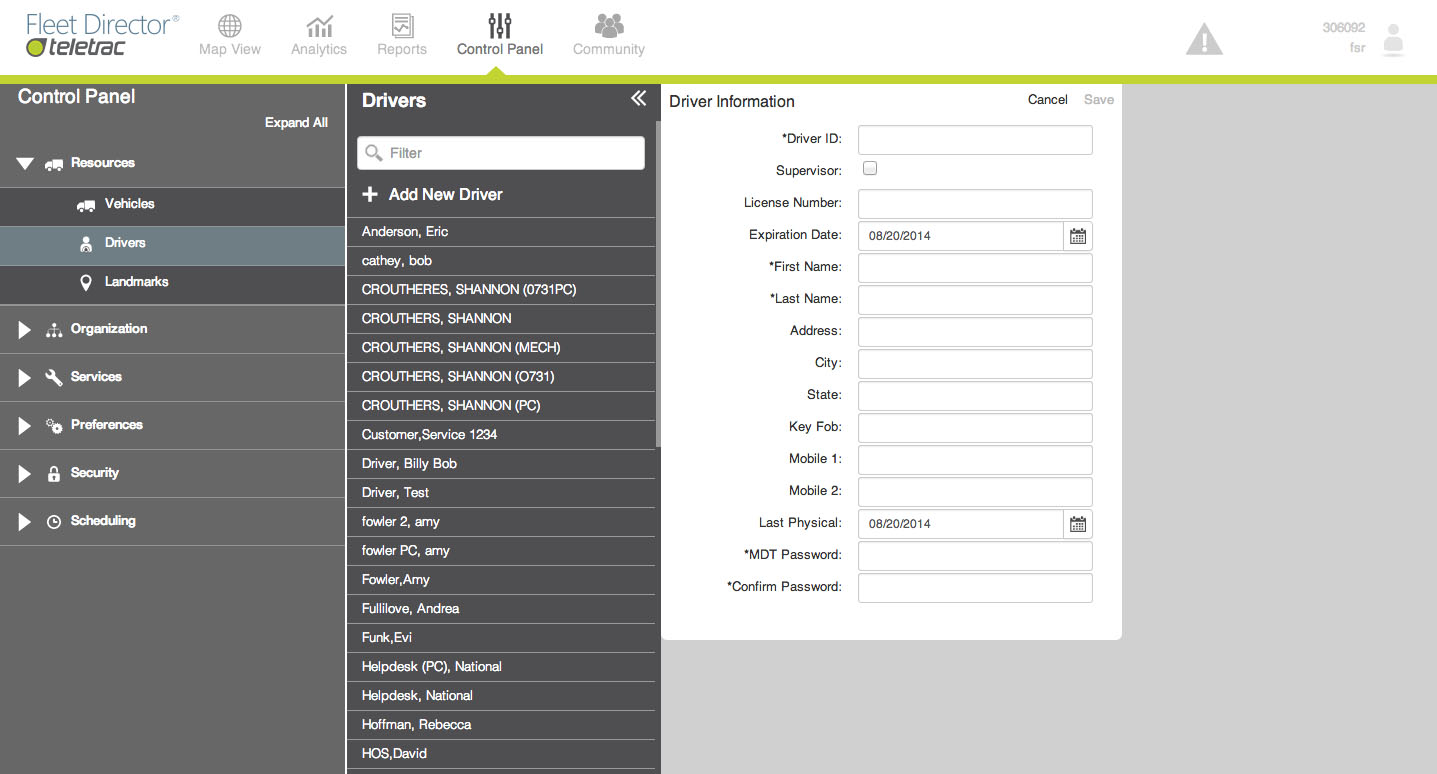
Drivers
Manage drivers and driver information.
Add a new driver.
- Select Drivers from the Resources list.
- Select + Add New Driver from Driver list.
- Fill out the driver form and select Save.
Edit an existing driver
- Select Driver from the Resources list.
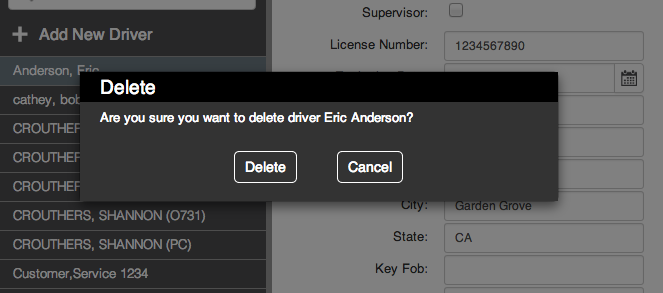
- Edit driver form and select Save, select Cancel to close or Delete to delete driver record. You must confirm delete in the pop up by selecting Delete.
|
FIELD |
DESCRIPTION |
|---|---|
|
Driver ID |
The Driver ID can include 1-8 letters and/or numbers: no spaces, punctuation or symbols. When entered in the MDT, numbers are suggested. |
|
Supervisor |
This check box allows you to mark a driver as a Supervisor. |
|
Key Fob |
The number of the RFID key fob a driver can log in with when equipped. |
|
First Name |
First name of the driver. |
|
Last Name |
Last name of the driver. |
|
Mobile1 |
First mobile phone number for the driver. |
|
Mobile2 |
Second mobile phone number for the driver. |
|
Last Physical |
Date of the driver's last physical. |
|
License Number |
Driver's license number. |
|
Expiration Date |
Driver's license expiration date. |
|
Address |
Street address as listed on the driver's license. |
|
City |
City as listed on the driver's license. |
|
State |
State as listed on the driver's license. |
|
MDT Password |
The MDT Password is seen as PIN on the driver display. The Password is 4-7 characters, numeric only: no spaces, punctuation or symbols. |
|
Confirm Password |
Retype the MDT Password here for confirmation. |
Landmarks
Add, import or edit landmarks that display on Map View. There are two types of landmark options. Radial landmarks are a single point on the map and Polygon landmarks are an area or region bounded by several points on the map.
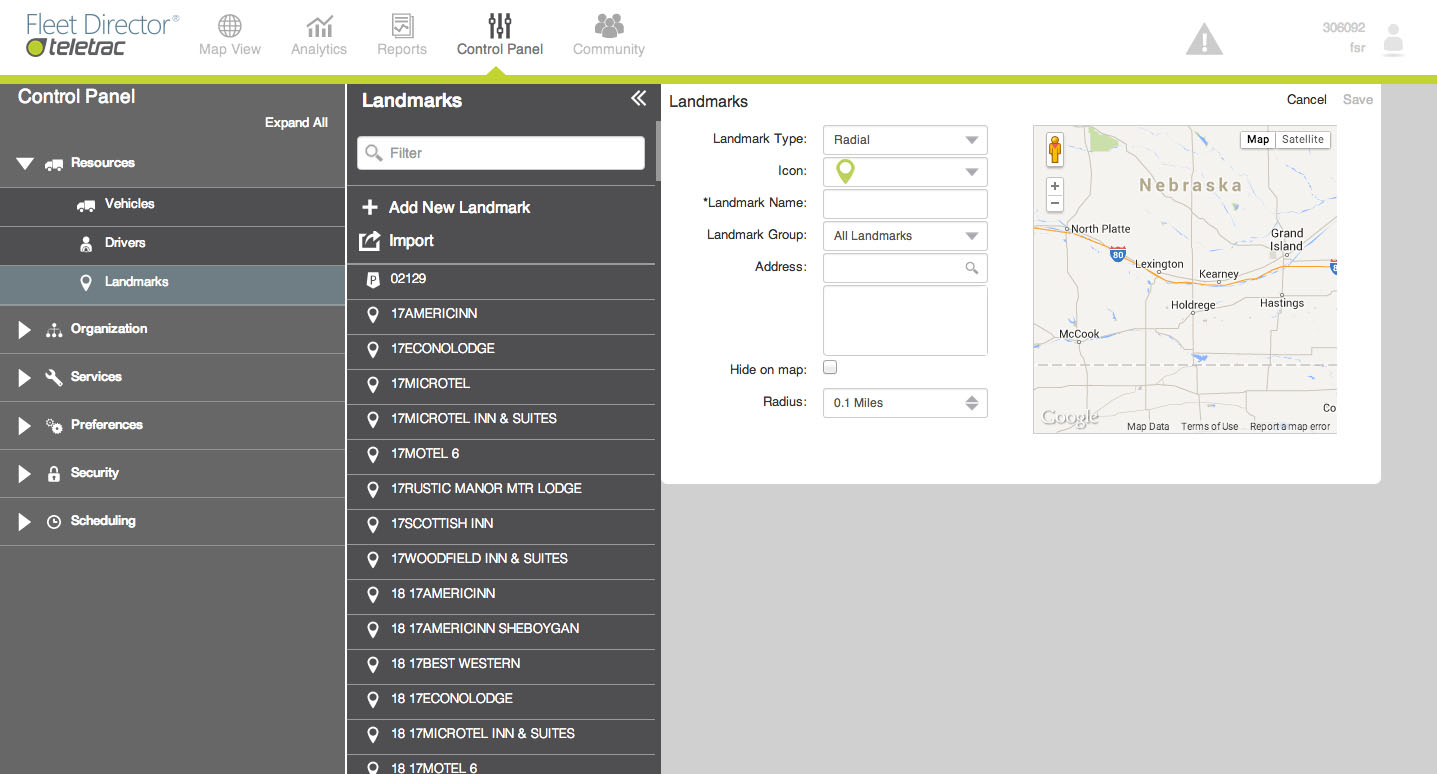
Add a new Radial landmark:
- Select “Landmarks” from the “Resources” list.
- Select “+ Add New Landmark”
- Select Radial from the “Landmark Type” drop down list.
- Choose an Icon and give the landmark a unique name.
- Search the address in the Address bar.
- Set the landmark radius
- “Save” the new landmark.
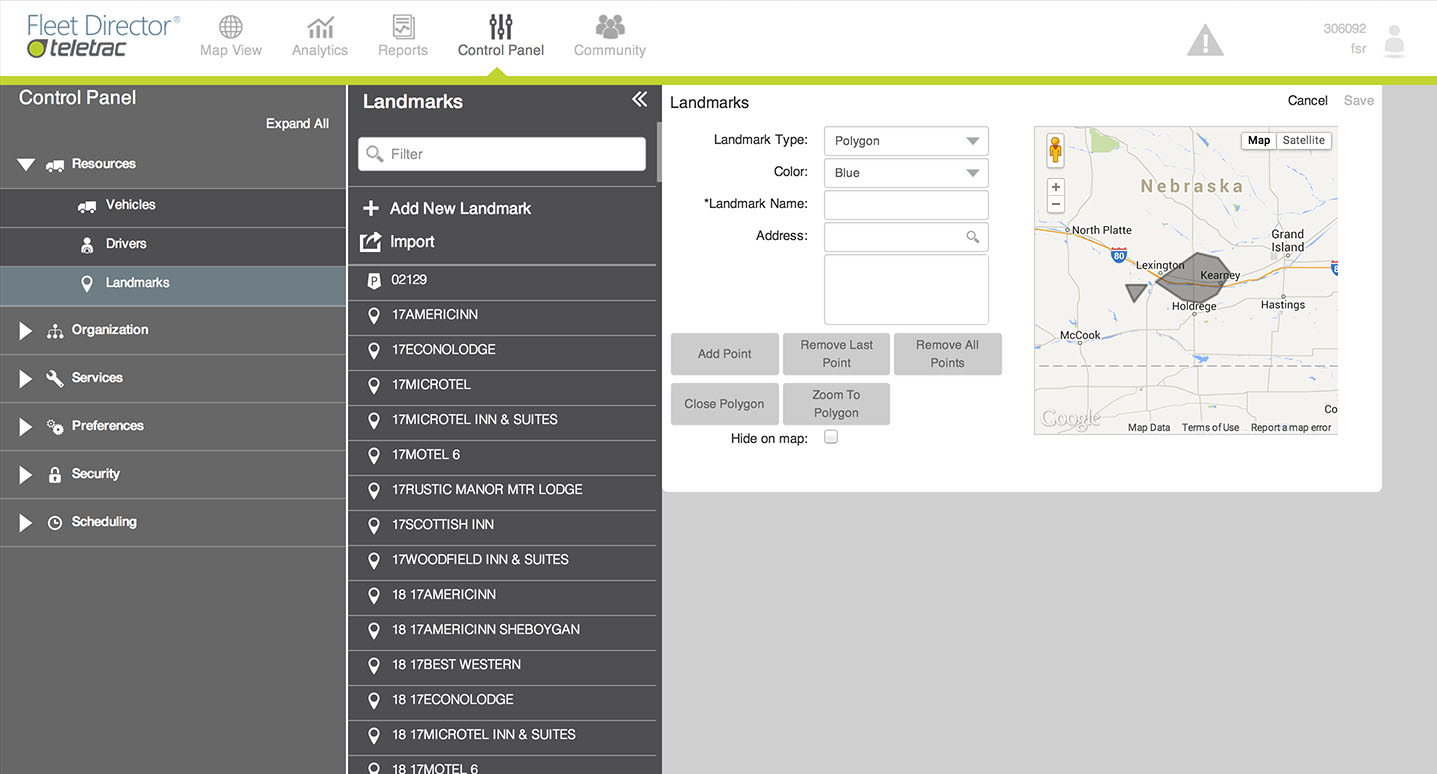
Add a new Polygon landmark:
- Select Landmarks from the Resources list.
- Select + Add New Landmark
- Select Polygon from the Landmark Type drop down list.
- Choose a color for your polygon and give it a unique name.
- Enter the first address point or lat long coordinates. Search results will return in large Address form box.
- Select Add Point to add the point to the polygon.
- Add points to create polygon and on last point select Close Polygon
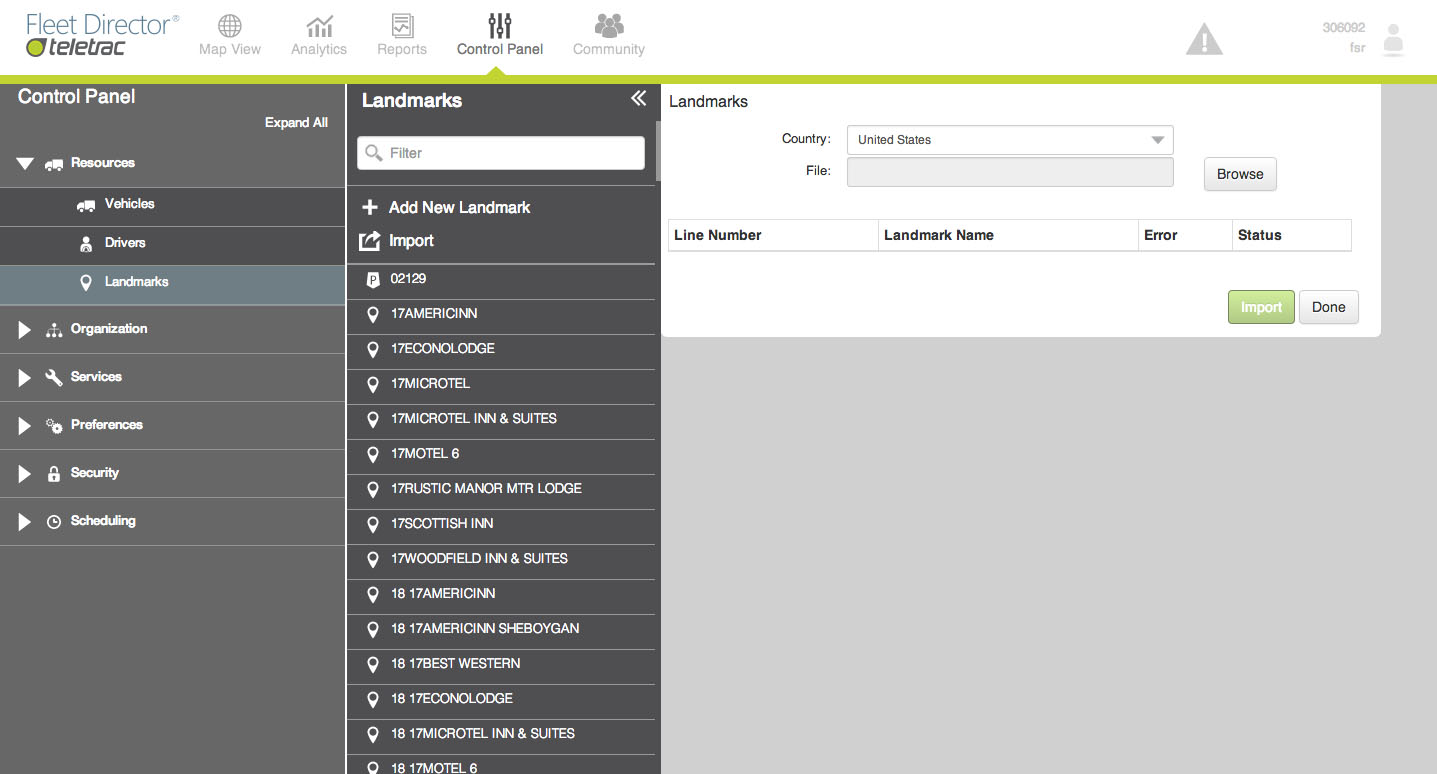
Import Landmarks:
- Select Landmarks from the Resources list.
- Select Import from the Landmark llist.
- Select the country from the drop down menu.
- Browse for the support file. Accepted files include .csv or .txt fie.
- Select Import to import files.
The file used to import Landmarks has specific requirements (below) and must be in comma delimited format (.CSV) or a text file (.TXT).
The information contained in the text file must include the following information:
- Name - The name of the Landmark (maximum 25 characters)
- Street - Building number and street name (maximum 100 characters)
- City - City Name (maximum 40 characters)
- State - USPS 2 letter state abbreviation (maximum two characters)
- Zip Code - Zip Code (maximum 9 characters)
- Icon Code – Can be added to define the map Icon displayed
Format Example:
Name,Street,City,State,ZipCode,IconCode = Teletrac Inc.,7391 Lincoln Way,Garden Grove,CA,92841,12
|
Icon Code |
Icon |
|---|---|
|
1 |
Landmark Green |
|
10 |
Push-Pin |
|
11 |
Center Icon |
|
12 |
Start |
|
13 |
End |
|
14 |
Blue Flag |
|
15 |
Red Exclamation |
|
16 |
Orange Horn |
|
17 |
Construction |
|
18 |
Green Arrow |
|
19 |
Tower 1-wide |
|
20 |
Tower 2-narrow |
|
21 |
Satellite |
|
23 |
Yellow Square |
|
24 |
Red Square |
|
25 |
Green Square |
|
26 |
Blue Square |
|
27 |
Yellow Circle |
|
28 |
Red Circle |
|
29 |
Green Circle |
|
30 |
Blue Circle |
|
31 |
Brown Square |
|
32 |
Cyan Square |
|
33 |
Black Square |
|
34 |
White Square |
|
35 |
Gray Square |
|
36 |
Landmark Blue |
|
37 |
Landmark Gray |
|
38 |
Landmark Orange |
|
39 |
Landmark Purple |
|
40 |
Landmark Red |
|
41 |
Landmark Yellow |
|
320 |
Red P |
|
321 |
Blue D |
|
322 |
Green A |
|
323 |
Yellow S |
|
324 |
Orange O |
|
325 |
Yellow S |
|
4063 |
Green Building |
The Text File Format requires the following information:
- Each line contains 1 record (Landmark).
- Each line must end in a CR LF (Hard Return or Enter).
- Do not leave spaces between the comma at the end of a field or the first letter of the next field.
- Do not use special characters (for example, commas, asterisks, apostrophes, semicolons, pound signs.).
The Excel file format requires the following information:
- Each row contains 1 record (Landmark).
- Only 1 worksheet is used.
- Do not leave spaces between, at the beginning, or end of the cell data.
- Do not use special characters (commas, asterisks, apostrophes, semicolons, pound signs, etc.)
Zip codes with leading zeroes (Massachusetts, New Jersey, New Hampshire) will not import correctly from an Excel file since Excel will remove the zeroes (for example, the zip code 02110 is shortened to “2110,” below):
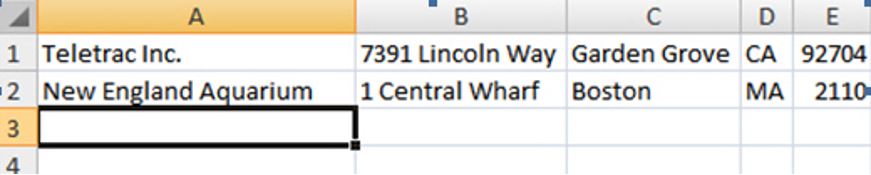
To fix the shortened zip code issue, users must set the columns format:
- Right-click on Column E.
- From the drop-down menu, click on Format Cells.
- From the Format Cells window, select Special from the Category list.
- In the Type section, select Zip Code. Click on the OK button to finish.
Your zip codes will no longer be removed. When the file is imported by the Landmark Import Tool, the leading zeroes will appear:

Organization
Sub Fleets
You can create vehicle sub-fleets to assign vehicles to a grouped fleet and arrange vehicles as groups in Fleet Director. Sub-fleets can be helpful when running reports, scheduling exceptions or using other functions, such as Nearest Vehicle.
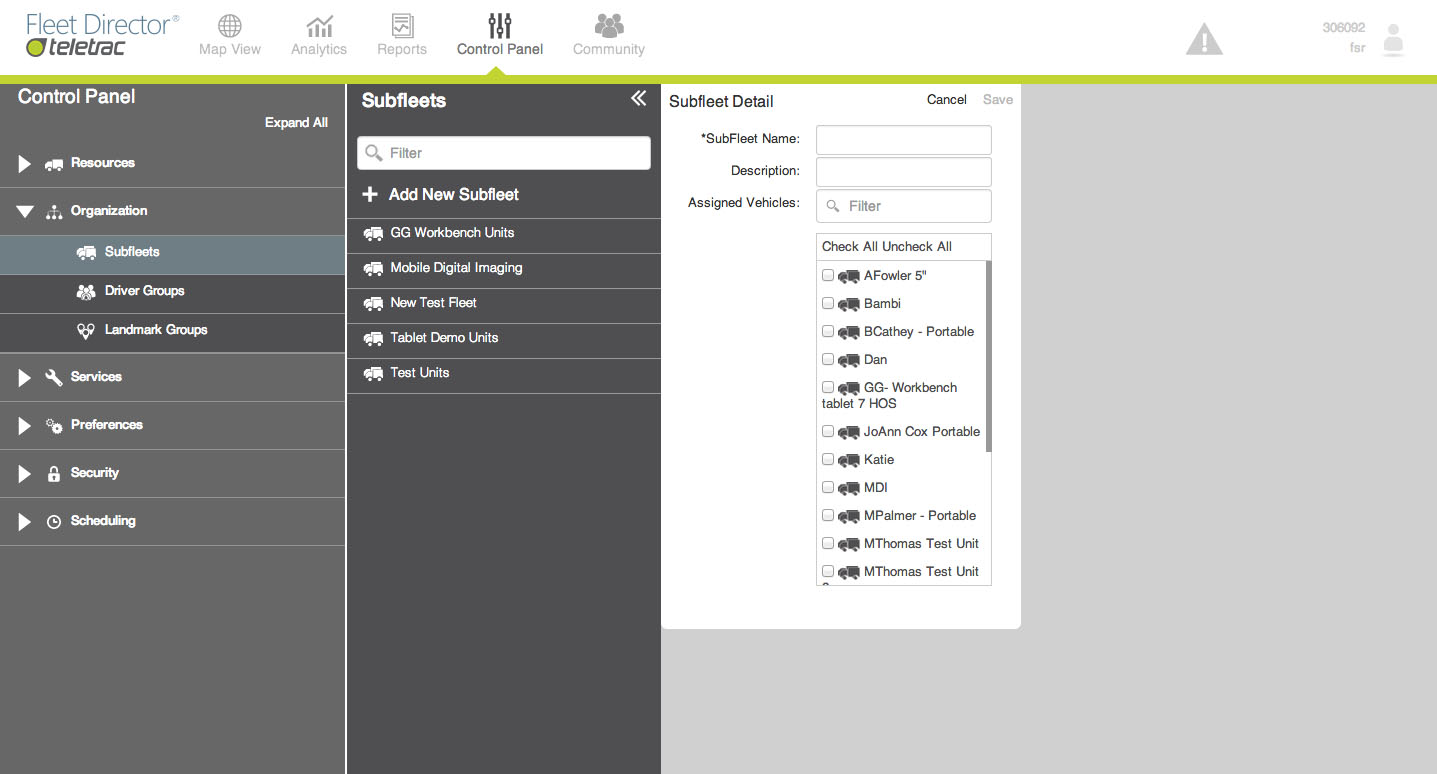
Create a new Sub Fleet:
- Select Sub Fleets from the Organization drop down.
- Select Add New Sub Fleet.
- Fill in Sub Fleet information form.
- Add vehicles to Sub Fleet from the tree view.
- Save new Sub fleet.
Edit an existing Sub Fleet:
- Select Sub Fleets from the Organization drop down.
- Select Sub Fleet from list.
- Edit Sub Fleet form.
- Add or remove vehicles in sub fleet from the tree view.
- Save changes.
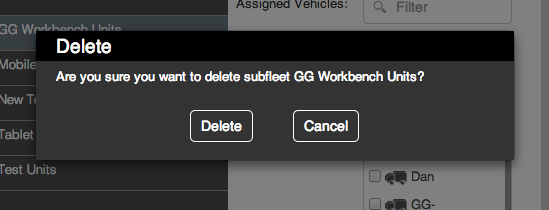
Delete existing Sub Fleet:
- Select Sub Fleets from the Organization drop down.
- Select Sub Fleet from list.
- Select Delete.
- Confirm deletion by selecting Delete again from pop up confirmation.
Driver Groups
You can create driver groups to organize your vehicles within Fleet Director. Driver Groups can be helpful for running reports, assigning driver watch list, or using the HOS in Fleet Director. The Drivers list on the left displays all driver records in the database for your account.
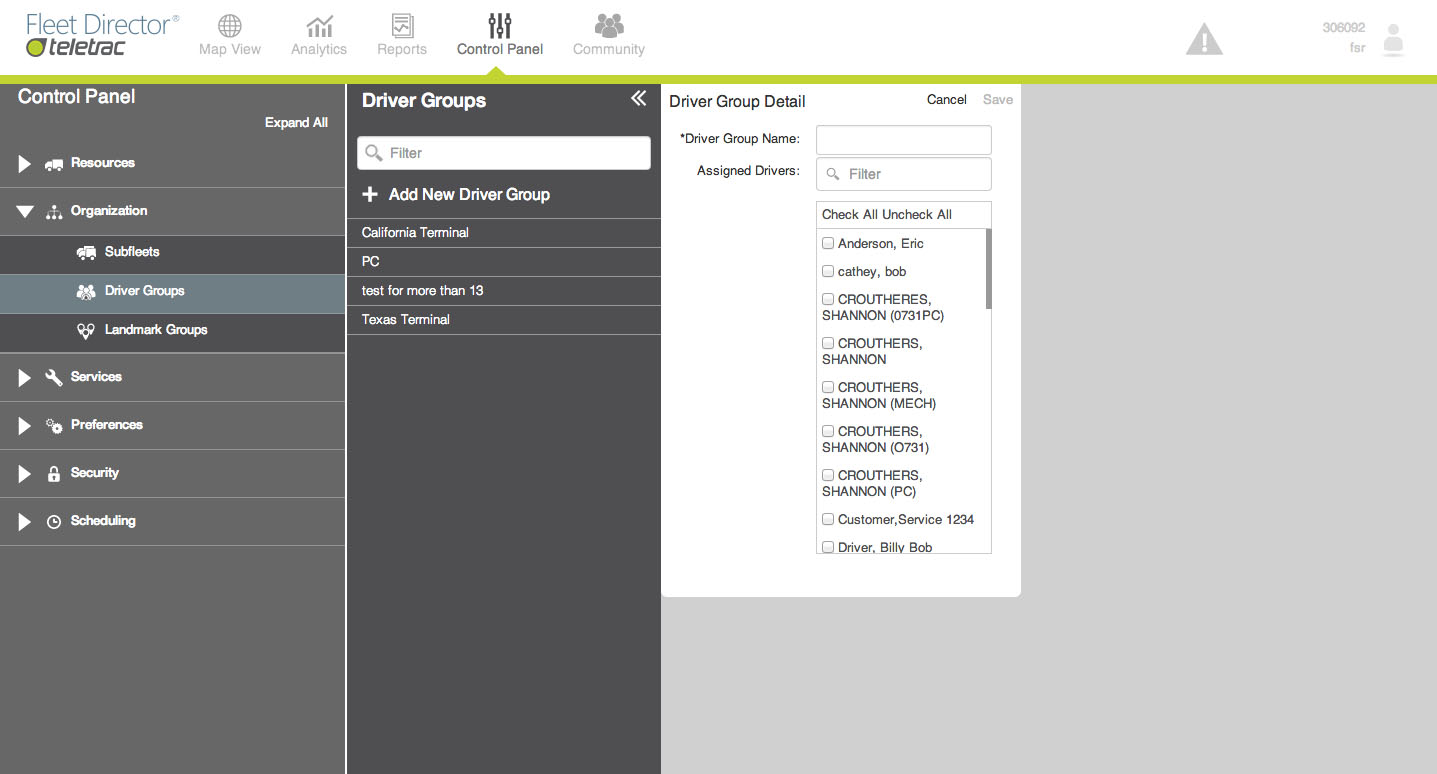
Create a new Driver Group:
- Select Driver Group from the Organization drop down.
- Select Add New Driver Group.
- Fill in Driver Group information form.
- Add Drivers to Driver Group from the tree view.
- Save new Driver Group.
Edit an existing Driver Group:
- Select Driver Group from the Organization drop down.
- Select Driver Group from list.
- Edit Driver Group form.
- Add or remove drivers from the tree view.
- Save changes.
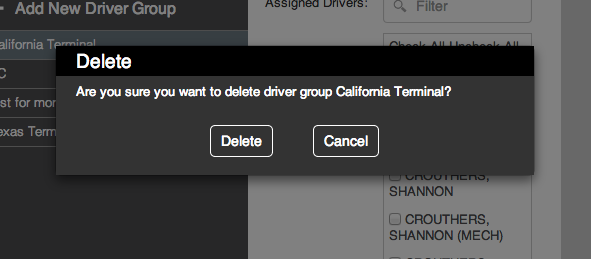
Delete existing Driver Group:
- Select Driver Group from the Organization drop down.
- Select Driver Group from list.
- Select Delete.
- Confirm deletion by selecting Delete again from pop up confirmation.
Landmark Groups
Creating Landmark groups allow you to arrange Landmarks to simplify running On Site reports and viewing them on the Landmarks list in the Side Menu. Fleet Director Users can edit existing Landmarks to add them into the Landmark group.
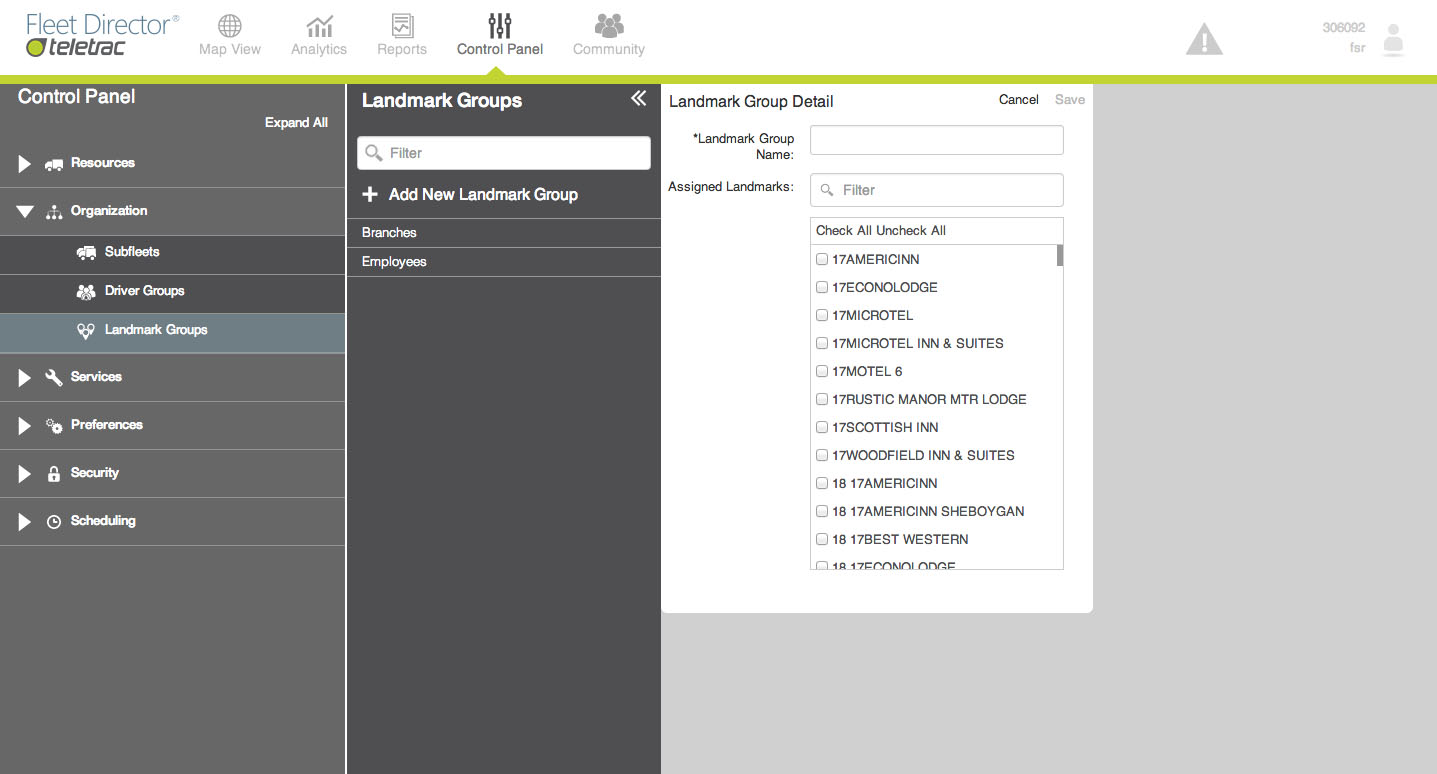
Create a new Landmark Group:
- Select Landmark Group from the Organization drop down.
- Select Add New Landmark Group.
- Fill in Landmark Group information form.
- Add Landmarks to Landmark Group from the tree view.
- Save new Landmark Group.
Edit an existing Landmark Group:
- Select Landmark Group from the Organization drop down.
- Select Landmark Group up from list.
- Edit Landmark Group form.
- Add or remove landmarks from the tree view.
- Save changes.
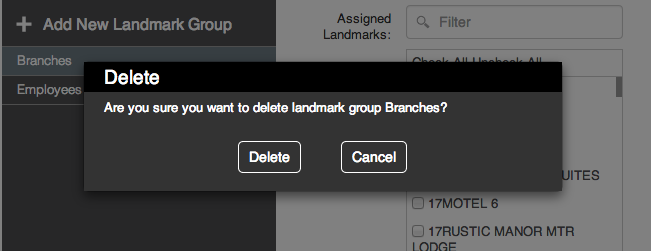
Delete existing Landmark Group:
- Select Landmark Group from the Organization drop down.
- Select Landmark Group from list.
- Select Delete.
- Confirm deletion by selecting Delete again from pop up confirmation.
Services
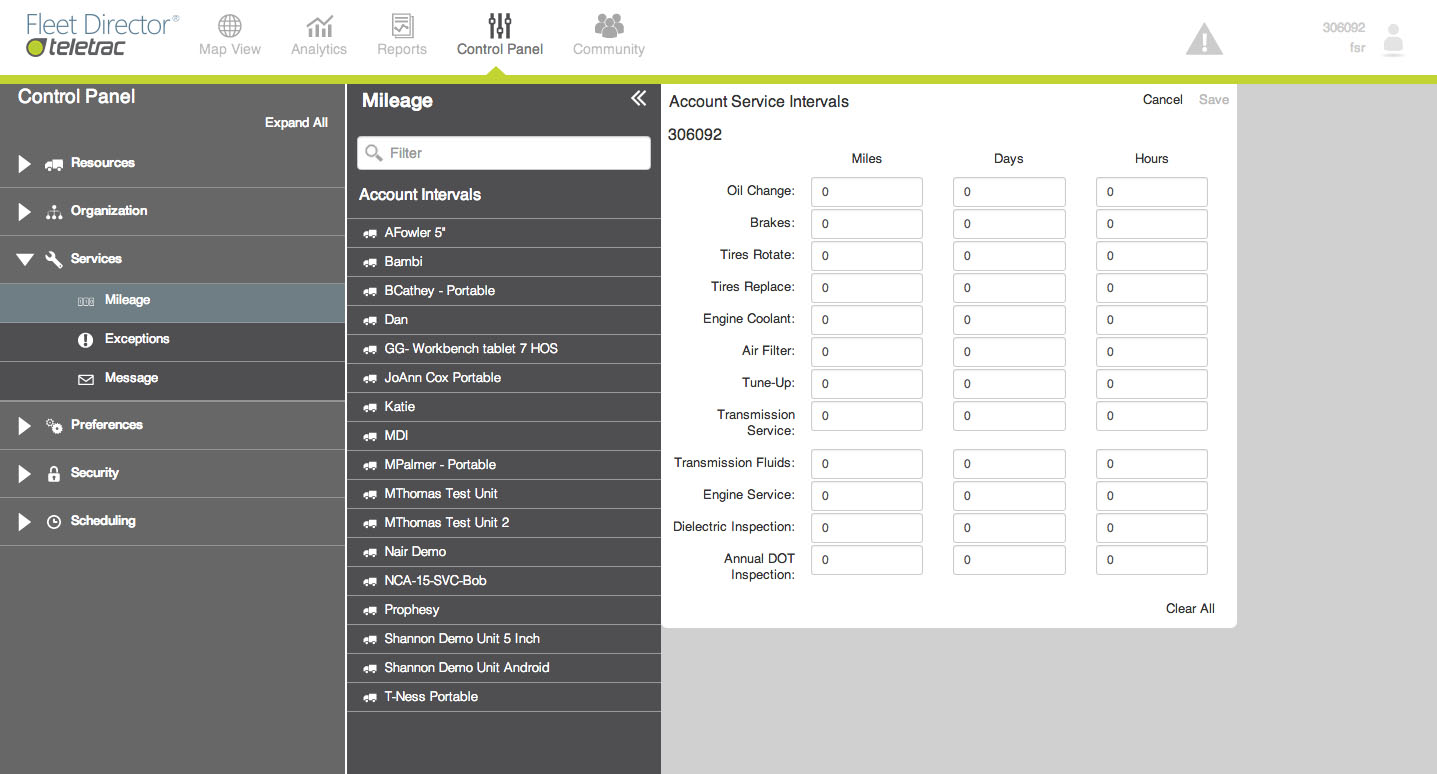
Mileage
Exceptions
Exceptions are a form of notification when the criteria set by the Fleet Director user has been met. Exceptions can provide remote notification to email and/or SMS to phone using the Alerts feature.
Exceptions that have been triggered will notify the Fleet Director user
- on the Map View tab in the Data View Exceptions tab
- on the Map View tab with a popup window
- on the Analytics tab as the Alerts widget
- on the Reports tab in the Vehicles section on the Exception report
Exceptions are available for:
- Zone
- Stationary Vehicle
- Scheduled Stop
- Out of Service
Examples of the information available and how to benefit from Exceptions:
- Has the vehicle been at a job too long using the Stationary type
- Is the vehicle is at an off limit area using the Zone-Inside type
- Is the vehicle being used without authorization using the Zone-Outside type
- Is the GPS is not locating due to driver tampering or equipment malfunction
Create an Exception:
- Select Exceptions from the Services menu.
- Select Add New Exception.
- Complete the exception form.
- Save the new exception.
Each Exception is defined and scheduled. Exceptions include a schedule to indicate which vehicles the exception applies to and what days of the week and time of day the exception should be monitored.
The following Types of Exceptions are available:
|
TYPE |
DESCRIPTION |
|---|---|
|
Zone |
Triggered when a vehicle is located inside or outside a zone (Landmark) for the specified time. |
|
Stationary Vehicle |
Triggered when a vehicle is motionless longer than the amount of time specified in the exception; the vehicle is considered stationary. |
|
Scheduled Stop |
Defines when and how long a vehicle should be at a specific Landmark. There are two types of Scheduled Stop Exception; Inside and Outside. |
|
Out of Service |
Triggered when a vehicle fails to send its location more than the number of times specified in the exception; the vehicle is considered out of service. |
The following statuses are available:
|
STATUS |
ABBREVIATION CODE |
|---|---|
|
Available |
AV |
|
Ignition Off |
OF |
|
Ignition On |
ON |
|
In Route |
IR |
|
In Yard |
IY |
|
Lunch |
LU |
|
Not Available |
NA |
|
Out of Service |
OS |
|
Priority Alert |
PA |
|
Sleep Mode |
SM |
|
Violation |
VI |
Once the exception has been create you must still schedule the exception.
- Open the saved exception from the list.
- Select Schedule. The Event Scheduler window appears.
- Select Add New Exception to add a schedule.
- Select Save.
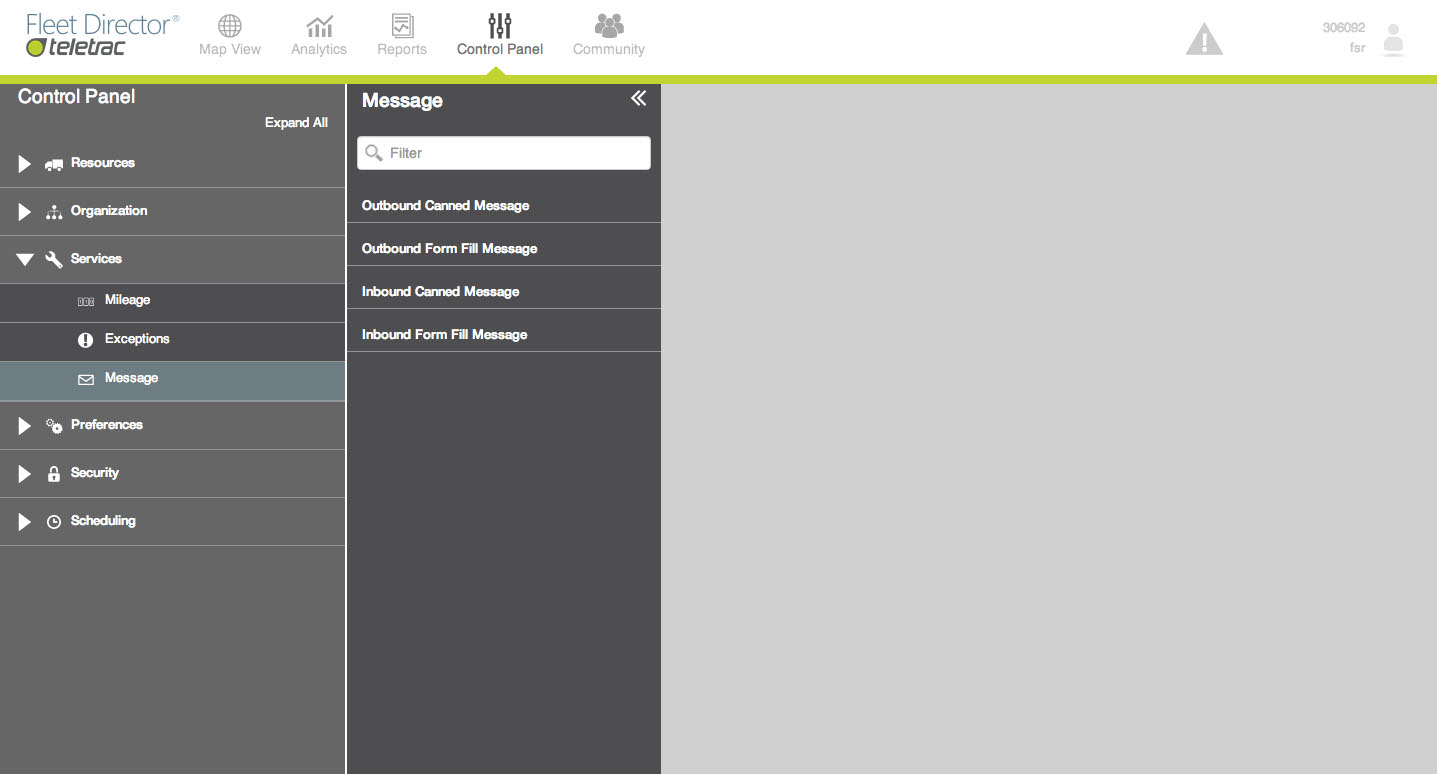
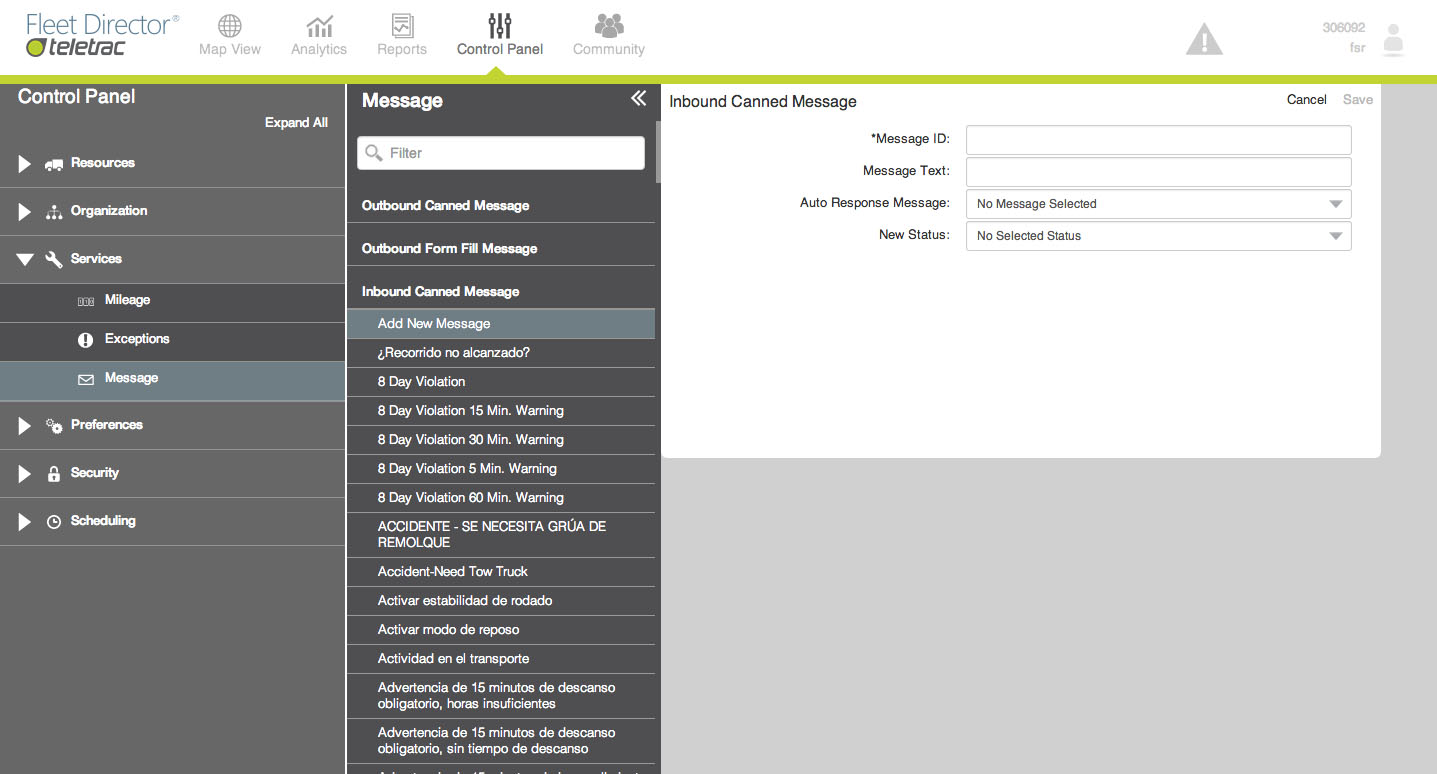
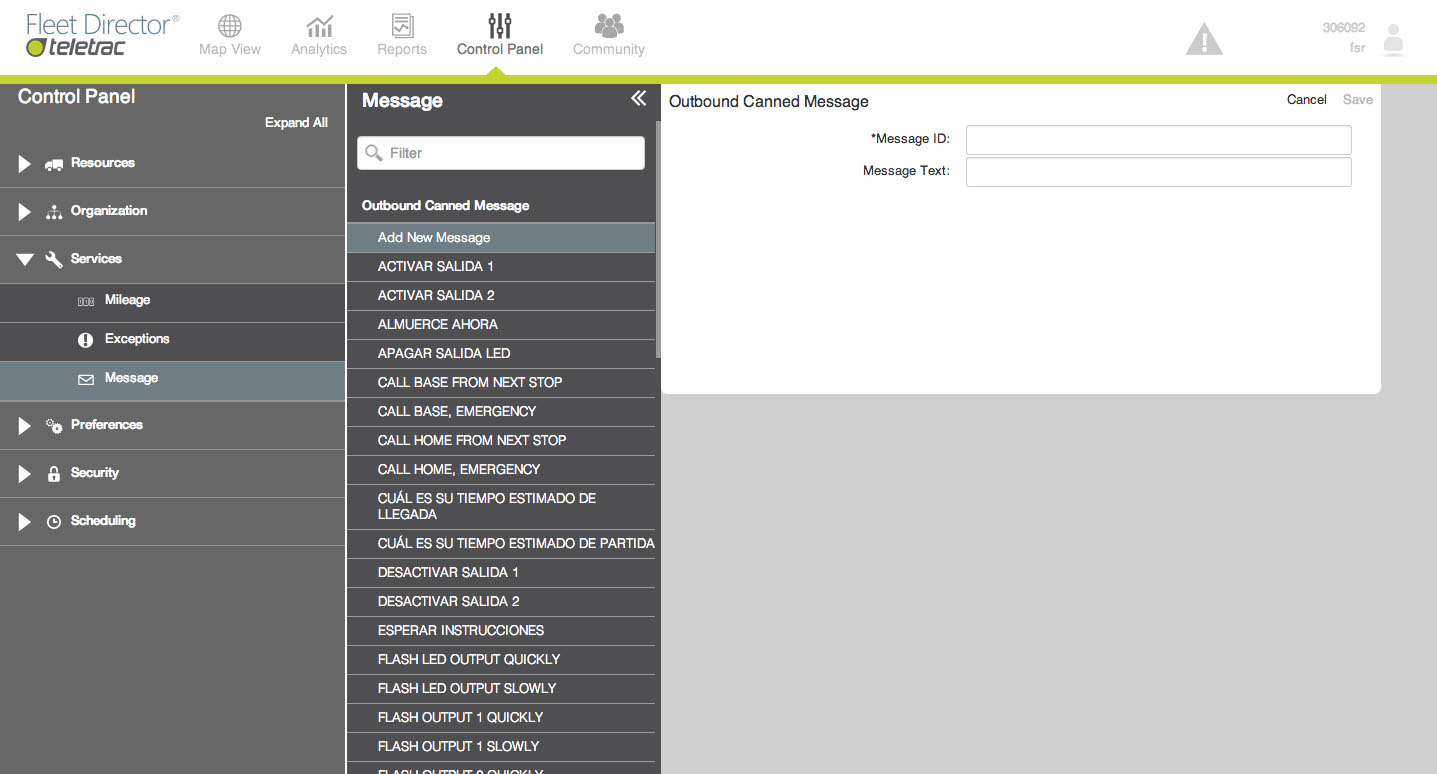
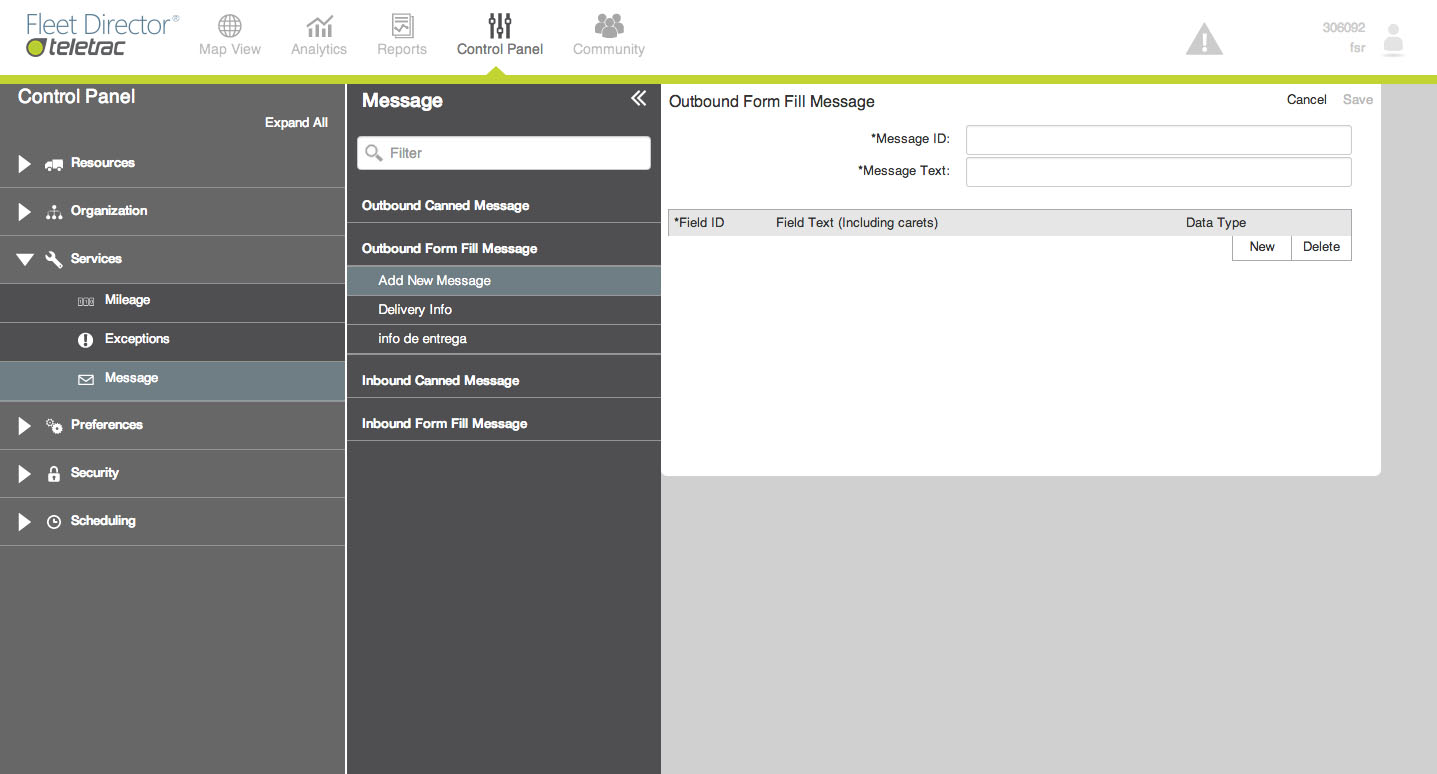
Message
Users can manage all Inbound and Outbound Form and Canned messages. Set up text and message ID’s for all pre-set messaging.
Add a new message:
- Select Message from the Services menu.
- Select one of the messaging groups (Outbound Canned/ Outbound Form Fill/ Inbound Canned/ Inbound Form Fill).
- Select Add New Message.
- Fill in message form.
- Save new message.

|
FIELD |
DESCRIPTION |
|---|---|
|
Vehicle |
This is the Vehicle, Sub-fleet or All Vehicles list to which you want to assign the Exception. |
|
Day of Week |
You can assign the Exception to trigger Monday through Sunday, Weekdays, Weekends or Everyday. If you want the trigger to change based on the day or days you can create multiple schedules using different Day of Week selections. |
|
Start Time |
The time you want the monitoring to start. The start time must precede the stop time. |
|
Stop Time |
The time you want the monitoring to stop. |
|
Status |
The value should remain No Selected Status. |
|
Description (optional) |
This is an optional description of the schedule. |
|
Monitor |
Check this box to monitor the Exception Condition. |
Preferences
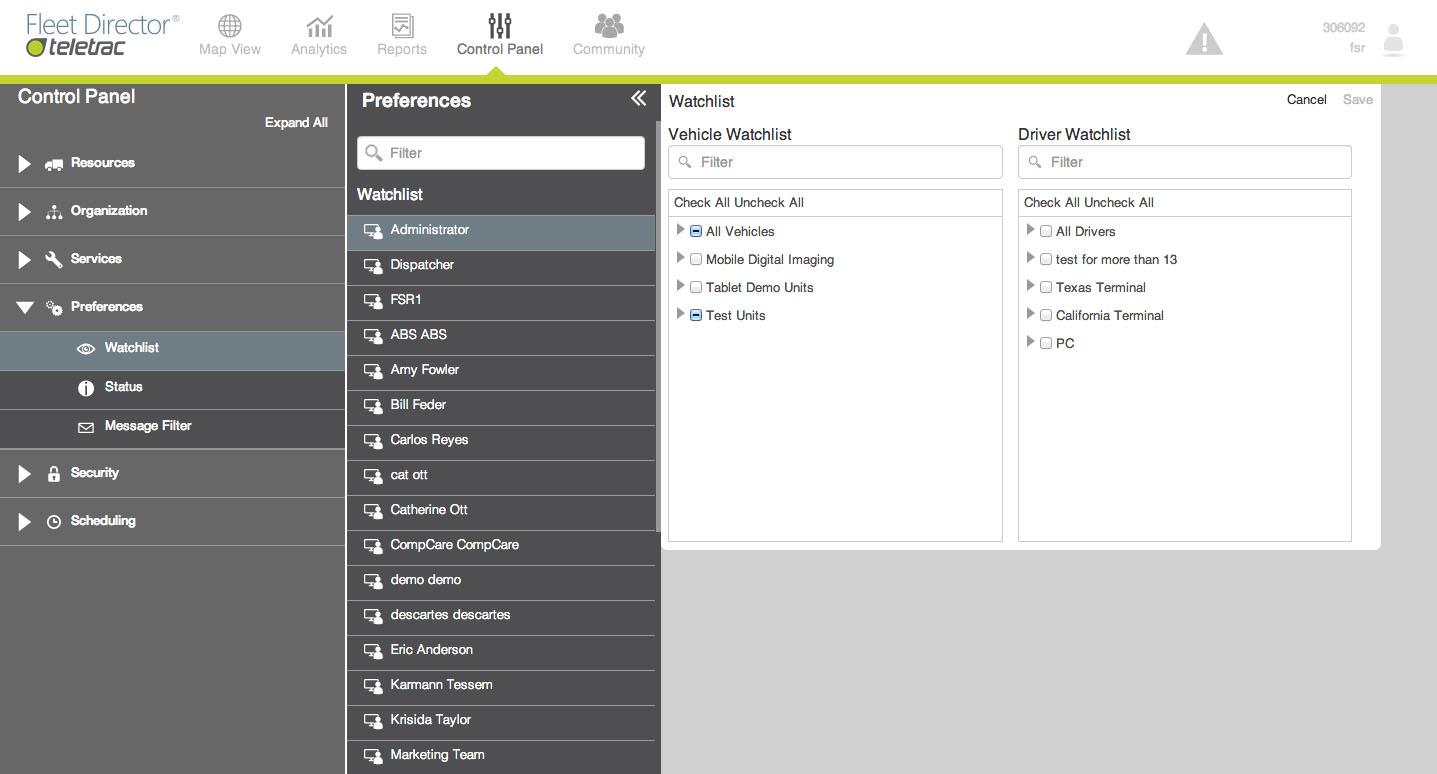
Watch list
Vehicle Watch list determines which vehicles are visible on the Map View Tab when a user logs in to Fleet Director. Users with specific security permissions can create Vehicle Watch lists for other users.
Create a new Watch list:
- Select Watch List from the Preferences menu.
- Select User from the Watch List menu, or search for user using the filter bar.
- Add Vehicles and Drivers to Watch List through tree views.
- Select Save.
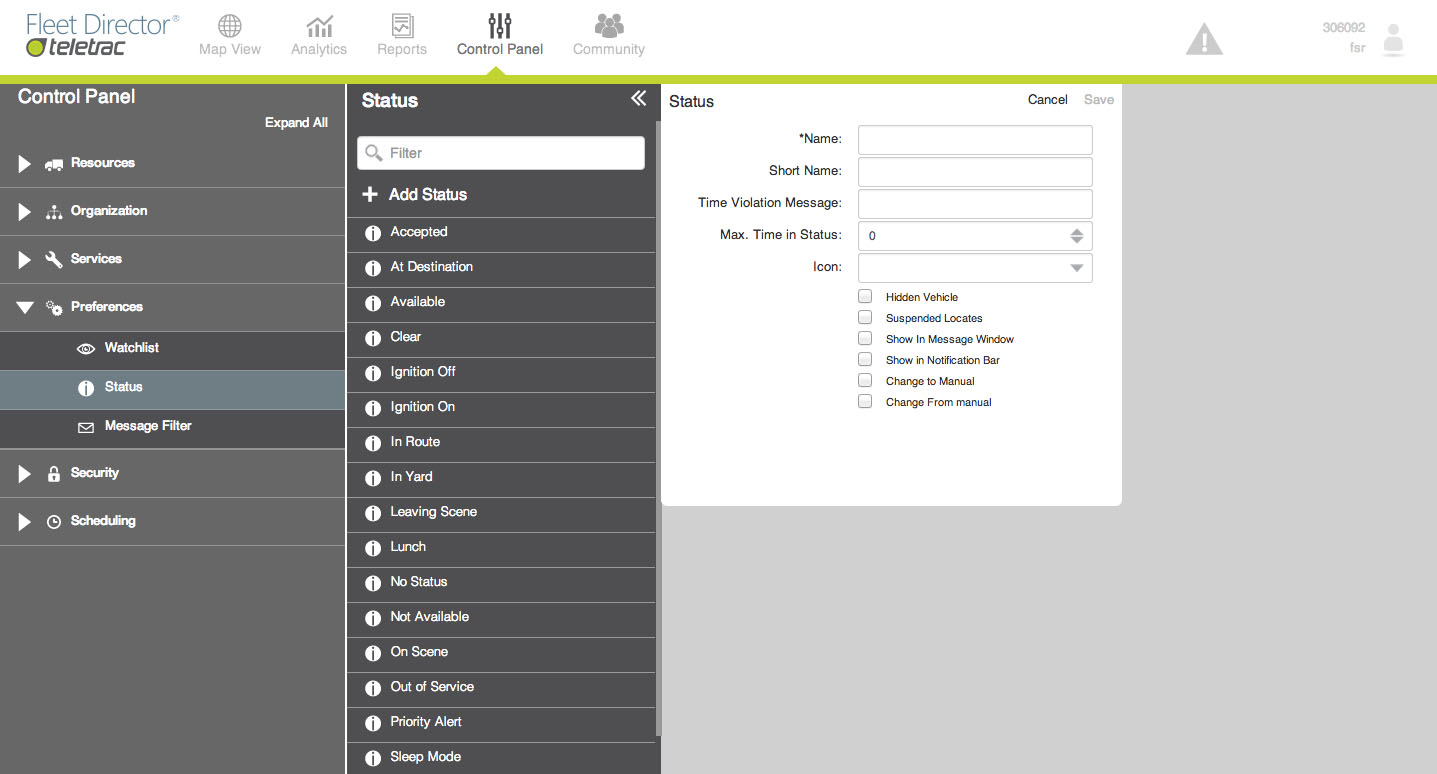
Status
A Status is linked to an Inbound Message or an Exception. It is displayed on the Map View tab and Reports. Fleet Director has the following default statuses:
|
STATUS |
ABBREVIATION CODE |
|---|---|
|
Available |
AV |
|
Ignition Off |
OF |
|
Ignition On |
ON |
|
In Route |
IR |
|
In Yard |
IY |
|
Lunch |
LU |
|
Not Available |
NA |
|
Out of Service |
OS |
|
Priority Alert |
PA |
|
Sleep Mode |
SM |
|
Violation |
VI |
Create a Status:
- Select Status from the Preferences menu.
- Select Add New Status.
- Complete Status form.
- Save new status.
Edit existing Status:
- Select Status from the Preferences menu.
- Select Status from list.
- Edit Status form.
- Save Status.
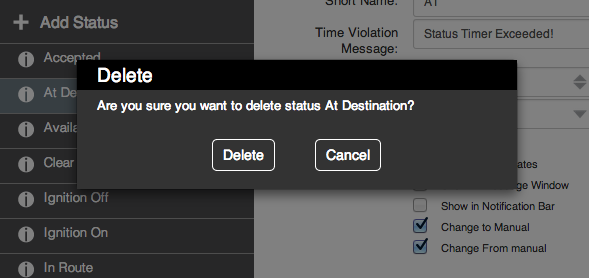
Delete an existing Status:
- Select Status from the Preferences menu.
- Select Status from list.
- Select Delete.
- Confirm deletion in pop up window by selecting Delete.
Message Filter
Users can set up inbound messaging filters to set notifications to be send to the Data View, Notification Center or display as a Pop Up window.
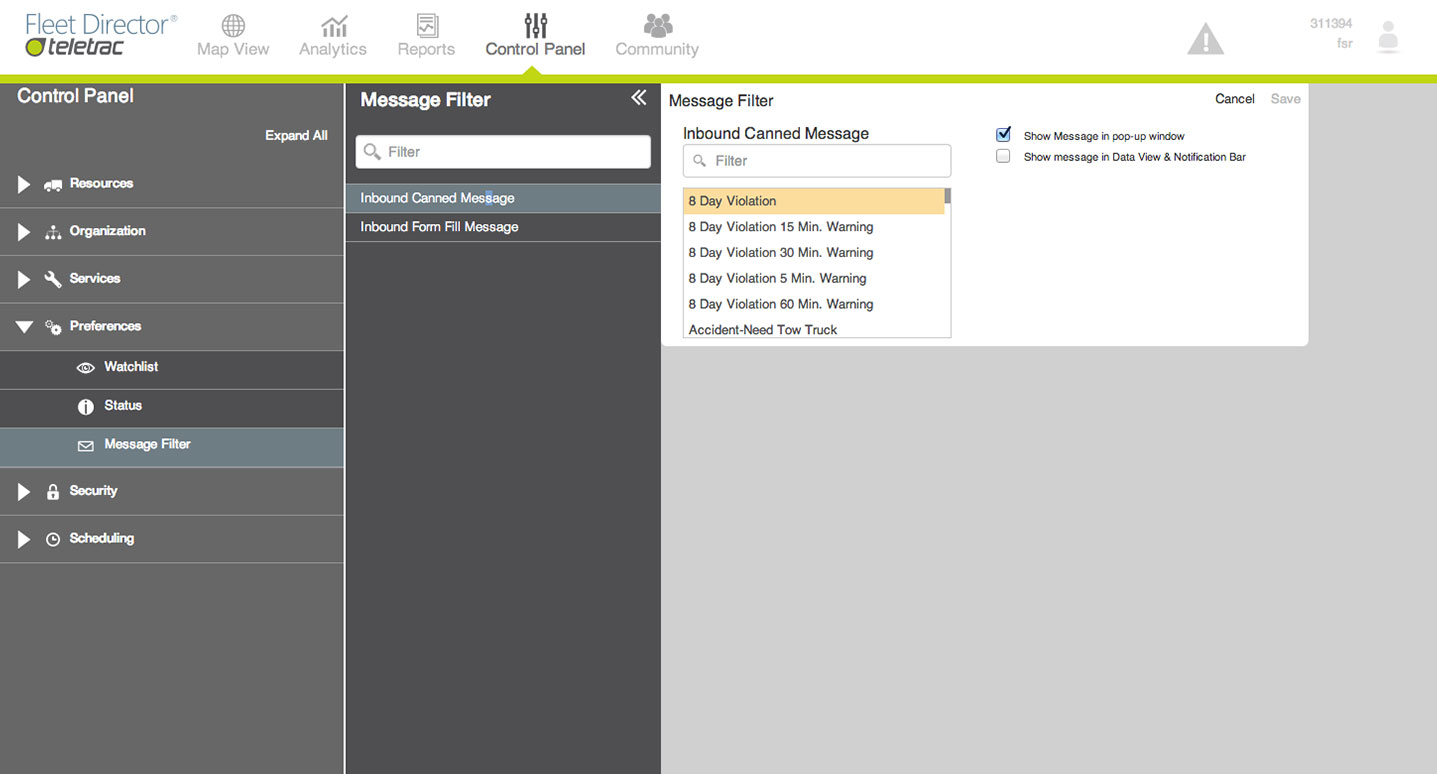
Set a Message Filter:
- Select Message Filter from the Preferences menu.
- Select either Inbound Canned or Inbound Form Fill.
- Select a message from the list.
- Check the box for the type of display you want to set for that message, users can select none, one or both.
- Select Save.
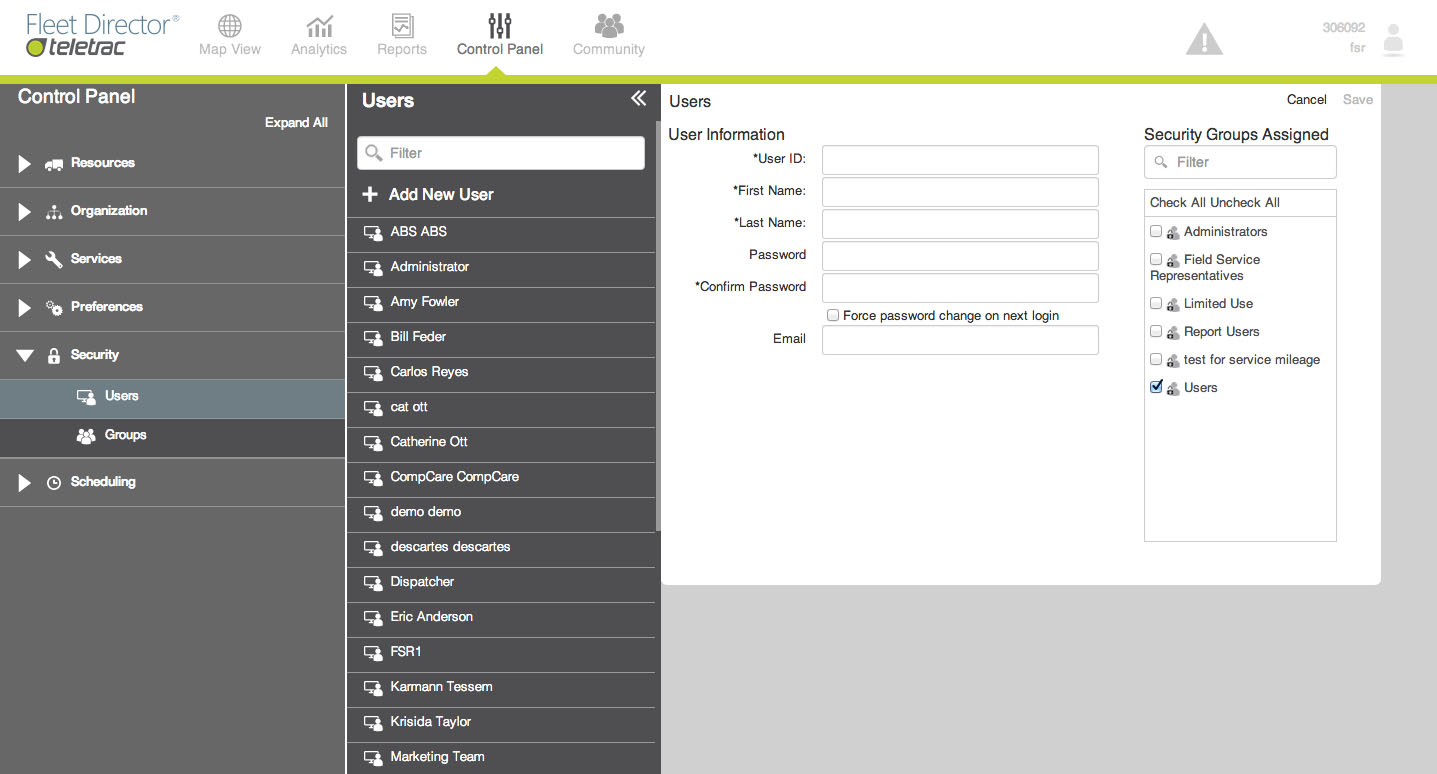
Users
A User record contains a Username and Password that must be entered to log in to Fleet Director. Each person who accesses Fleet Director should have their own unique user record (password, username).
|
FIELD |
DESCRIPTION |
|---|---|
|
User ID |
The username used to log in to Fleet Director. Requires three or more characters not to include symbols, spaces or punctuation. |
|
First name |
User’s first name. |
|
Last Name |
User’s last name. |
|
Password |
The password used to log in to Fleet Director. Requires three or more characters: no symbols, spaces or punctuation. |
|
Confirm Password |
Retype password for confirmation. |
|
Force password change on next login |
Option to force user to change password upon next login. |
|
|
User’s email address. |
Create a New User:
- Select Users from the Security menu.
- Select + Add New User from the Users list.
- Fill out the form with user information.
- Assign the user to a Security Group.
- Select Save.
Edit an existing user:
- Select Users from the Security menu.
- Select User from the Users list.
- Edit the form with user information.
- Select Save.
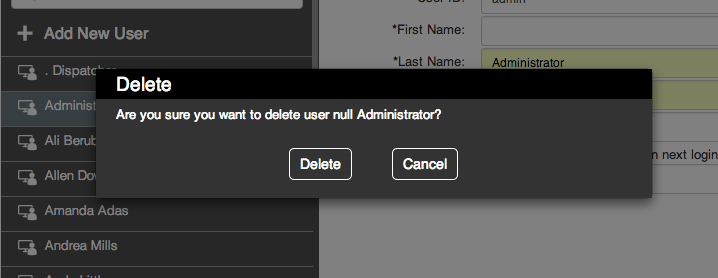
Delete an existing user:
- Select Users from the Security menu.
- Select User from the Users list.
- Select Delete.
- Confirm by selecting Delete from the pop up window.
Groups
Users can create security groups and assign users to them. Set access times and control functional permissions.
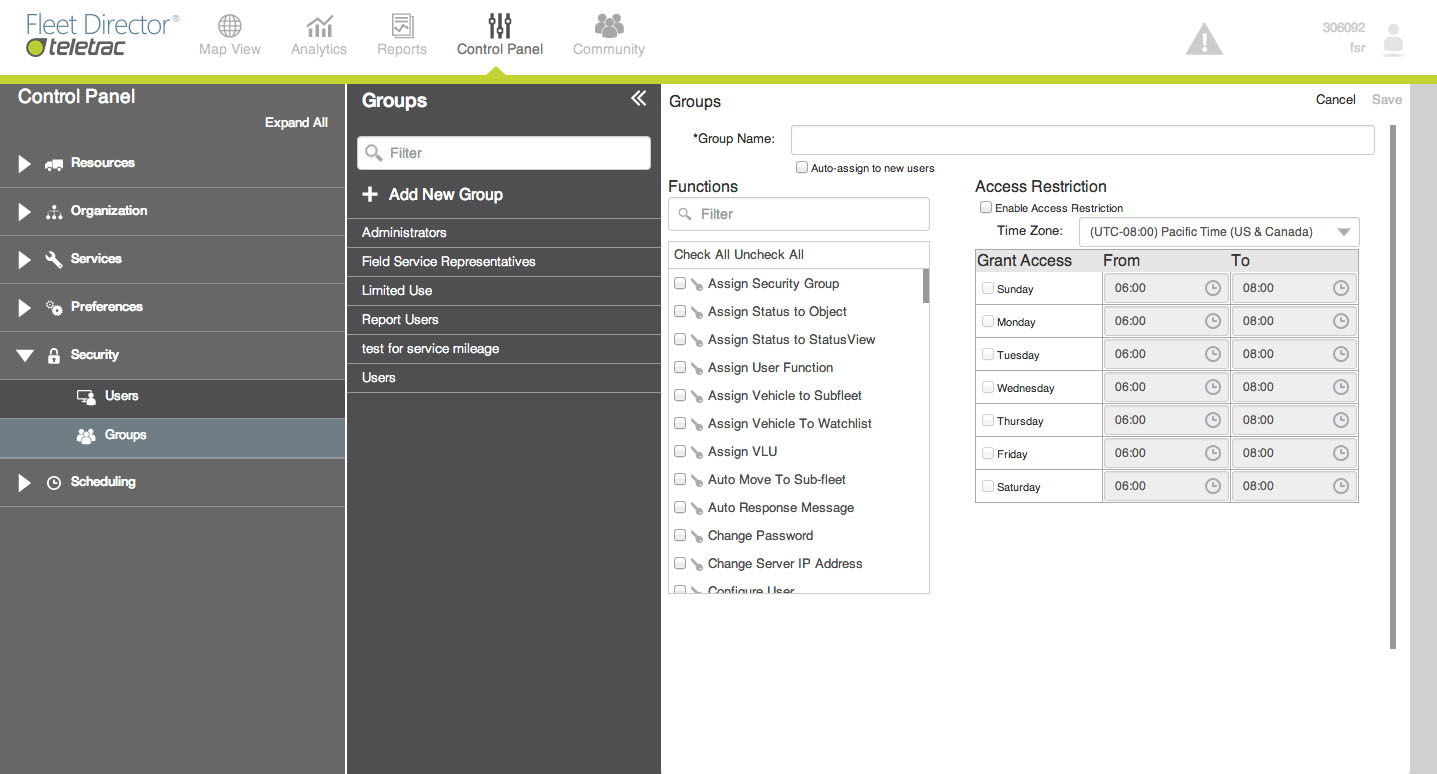
Create a new group:
- Select Groups from the Security menu.
- Select + Add New Group from the groups list.’
- Assign a unique Name to the group.
- Check all Functional Permissions.
- Set Access Restrictions.
- Select Save.
Edit an existing group:
- Select Groups from Security menu.
- Select Group from list.
- Edit Functional Permissions
- Edit Access Restrictions
- Select Save.
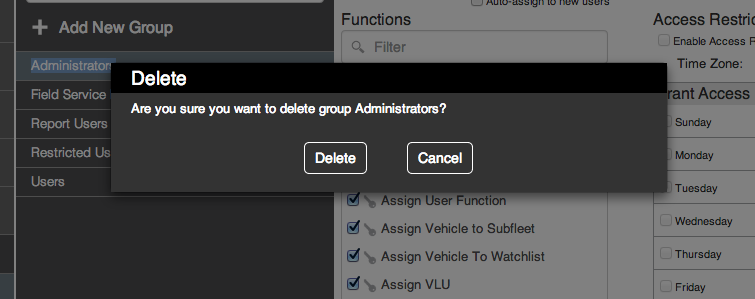
Delete an existing group.
- Select Groups from Security menu.
- Select Group from list.
- Select Delete.
- Confirm by selecting Delete from pop up window.